
Make an amazing WordPress front-page.php file
If you’re learning how to build your own WordPress theme and looking for blocks of code and instructions to make it happen, you’re in the right place. In this article, build your WordPress front-page.php file from scratch with theme divs – self-contained blocks of code to paste into your theme files.
Like plugins, theme divs function the moment they’re pasted in. That means, they contain all the PHP, HTML, JAVA, and CSS in one piece. Along with theme divs, surrounding code is provided for your WordPress front-page.php file from top to bottom. On top of that, instructions and explanations are provided to help you get it right and to learn as you go.
After building your WordPress front-page.php file, learn how to modify it to match your design. Later, add or swap out theme divs to change it up. Now, to build an amazing WordPress front-page.php file and receive technical explanations, homepage design ideas, and theme divs to plug right in, keep reading…
WordPress front-page.php overview
Your WordPress front-page.php file is one of a few page PHP files that load and present primary page content. For example, your About page is loaded and presented by your page.php file and your blog post by your single.php file. These files are automatically opened by WordPress when an internal page or post is visited.
Regarding your WordPress front-page.php file, it loads and presents the most important website content – your homepage. Once in place, WordPress automatically opens this file when your homepage or root URL – yoursebsite.com is visited.
Almost all WordPress page and post PHP files have one thing in common – they load your header and footer PHP files. That way, your top content such as your header menu and your bottom content like your footer contact info are presented consistently on every page and post.
Between your header and footer lies your primary content – in this case, your homepage content. As such, this is where you put your highest-priority sales copy and CTAs (Call To Action)s. To effectively convert visitors into subscribers or customers, your WordPress front-page.php file must be amazing!
Let’s get started…
Your WordPress front-page.php starting point
Normally, the first thing your WordPress front-page.php file does is load your header.php file. Then, the last thing it does is load your footer.php file. All three of these files typically display data from your WordPress Dashboard panel like company name, tagline, and address, along with many other types of data. This data is stored in your WordPress database.
Unfortunately, database accesses take time – they slow down your website, hurting both UX (User Experience) and SEO (Search Engine Optimization). Therefore, retrieve all needed data from the database just one time and then store it in an array variable. Then, pass that array to your header and footer using WordPress functions. This strategy prevents additional database accesses.
To download a basic theme containing all of the folders and files needed for your WordPress theme, click on HOW TO BUILD A WORDPRESS THEME. The WordPress front-page.php file in that theme already contains the surrounding PHP code and a theme div section containing Lorem Ipsum text for fill content. I recommend deleting the contents of that WordPress front-page.php file before proceeding, so you can walk through the entire process effectively.
WordPress functions make PHP quick and easy
Avoid extensive PHP programming by using built-in WordPress functions. As you’ll see, WordPress provides a giant library of functions that perform every task imaginable. Provided in this article, the theme divs and surrounding code contain WordPress functions that perform the heavy lifting.
The first WordPress functions at the top of your WordPress front-page.php file retrieve data from the database. That data is placed into an array to be used throughout your website. As such, that array is passed to your header and footer as mentioned. Also, that array is available any time the data is needed within your content.
Language symbols for comments
Each language (CSS, HTML, PHP, and JAVA) uses different symbols for comments. Below is a quick symbol reference:
//is used for PHP comments – everything on the same line after this symbol is a comment/*signifies both PHP and CSS comments within/* and */and can span multiple lines<!--signifies an HTML comment within<!-- and -->and can span multiple lines
Fill WordPress front-page.php $info array with information
The following block of code fills an array called $info with information either manually entered or from your WordPress Dashboard panel – your WordPress database. This array gathers your website title, tagline, the path to your theme files, your site URL, and a manually-entered phone number and email. Now, paste in the code below to the top of your WordPress front-page.php file:
<!DOCTYPE HTML> <!-- FRONT PAGE -->

<?php /* Gather all data from the WordPress Dashboard Settings > General stored in the database */
$info = array(
	'name'		=> get_bloginfo('name'),
	'desc'		=> get_bloginfo('description'),
	'uri'		=> get_template_directory_uri(),
	'url'		=> site_url(),
	'email'		=> "your-name@yourwebsite.com",
	'phn'		=> "your phone number"
);
At the very top, your WordPress front-page.php file declares itself as an HTML file with the <!DOCTYPE HTML> tag. That means, HTML will be the default for this file. PHP sessions are opened and closed throughout the HTML using the <php opening tag and the ?> closing tag.
Walk through each WordPress function in your WordPress front-page.php file:
get_bloginfo()retrieves site info from the databaseget_template_directory_uri()retrieves your theme template directory URIsite_url()retrieves the URL for the current siteget_option()gets an option value based on its name in the database
How WordPress front-page.php loads data into an array
As you can see within the PHP above, the $info array with key => value pairs resides inside the array() PHP construct. It takes any number of comma-separated key => value pairs as arguments. To explain, each value is connected to a key within the array as you see in the structure below:
array(

key  => value,

key2 => value2,

key3 => value3,

...Add as many 'key => value' pairs as you wish

)
The first key => value pair in the $info array is: “name” => get_bloginfo(‘name’). Once defined like this, $info[‘name’] contains the website title. It retrieves the title using the get_bloginfo() WordPress function, which does the work for you. Additionally, ‘desc’ => get_bloginfo(‘description’) loads the tagline. Enter these values in your WordPress Dashboard Settings > General panel.
Next, the $info array pulls in two web address values. First, $info[‘uri’] loads your template URI, which is your WordPress theme directory URI. It does this using the get_template_directory_uri() WordPress function. Then, $info[‘url’] loads your website URL, yourwebsite.com, using the site_url() WordPress function. Use these for links within your HTML and content as needed.
Finally, add two values manually into your WordPress front-page.php file between the quotes. In the future, create custom fields for your WordPress Dashboard to contain these values and more. Click on admin.php file to see how this is done. But for this article, we’ll keep it simple and manually add those values.
Header & footer loaded by WordPress front-page.php
Your header.php file is loaded right after defining the $info array. Then, your footer.php file is loaded at the bottom of your WordPress front-page.php file. Finally, your WordPress front-page.php content goes between them as the HTML comment suggests. Now, paste the following code below the array:
get_header('', $info); ?>

 <!-- Homepage theme divs go here -->

<?php get_footer('', $info); ?>
Walk through each WordPress function in your front-page.php file so far:
get_header()loads header.php and allows data to be passedget_footer()loads footer.php also allowing data to be passed
Your WordPress front-page.php theme divs will go between the get_header() and get_footer() WordPress functions. As you can see in the parentheses of each of these two functions, the $info array is passed to your header and footer so they don’t have to access your WordPress database.
Now your WordPress front-page.php file operates
The two PHP code blocks you’ve added so far represents a complete WordPress front-page.php file, but with no content to display. Now that the surrounding code is in place from top to bottom, lets look at homepage content – your homepage theme divs. As you’ll see, these theme divs are self-contained and pasted in piece-by-piece.
WordPress front-page.php above-the-fold
As mentioned, your homepage content represents your website at the highest level, containing your most-important CTAs and sales copy. Since this is your most-visited web page – the root of yourwebsite.com, make it count. In other words, your homepage gets the most attention in terms of design.
Your above-the-fold content
Above the fold simply means everything that is visible without scrolling down. And since over 70% of website visitors do not scroll down, compel them and cater to them right there at the top. That means, put every important element of your website above the fold for quick-and-easy access – your hero section to compel them, CTA, contact info, and your most important offer.
Design a compelling hero section
Your website hero section is where first impressions are made. On top of that, It’s the most visited and visible part of your website. As such, this is where most visitors decide whether to continue further or not. As heroes save the day, your hero section saves the visit by turning visitors into a seekers wanting more.
There are some fundamental questions to answer in your hero section. Specifically, these answers include: who you are, what you do. Most importantly, your website visitor must quickly see what they will gain from your website. Since this article is about your Website front-page.php file, that’s all I’ll present about design.
HERO-SECTION theme div for WordPress front-page.php
The following hero-section layout comes from my personal web-development portfolio website hixonic.com. Click the link to evaluate it. Besides the images, there are some differences since it’s a more advanced example, but the layout is the same:
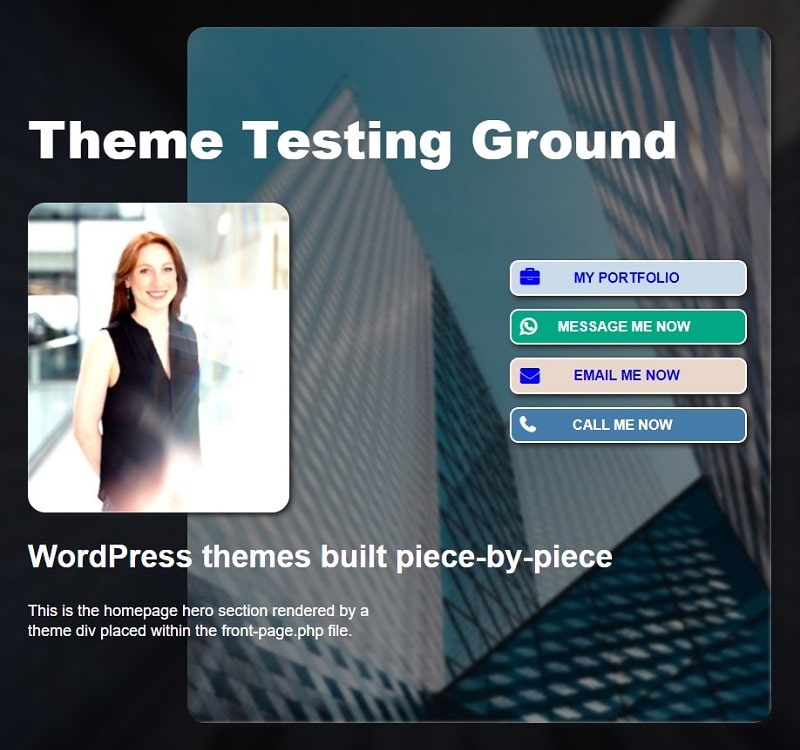
Simply paste the following HERO-SECTION theme div into your WordPress front-page.php file under or in place of the <!– Homepage theme divs go here –> comment:
<section class="front-hero">
	<!-- stationary background image -->
	<img src="<?php echo $info['uri'] . '/images/hero-bg-250x140.jpg'; ?>" class="hero-img" alt="<?php echo $info['name']; ?>">

	<div class="hero-content-wrap">
		<div class="hero-content color-wht">
			<h1 class="color-wht"><?php echo $info['name']; ?></h1> <!-- Site title from Dashboard -->
			<div class="img-btns-wrap">
				<img src="<?php echo $info['uri'].'/images/face-320x380.jpg'; ?>" class="face" alt="<?php echo $info['name']; ?>">
				<div class="btns-wrap">
					<a href="<?php echo $info['url'].'/portfolio/'; ?>" class="bg-lt-blu"><i class="fa fa-briefcase"></i><span>MY PORTFOLIO</span></a>
					<a href="whatsapp://send?text=Hello from <?php echo $info['name'];?>&phone=+<?php echo $info['phn'];?>&abid=+<?php echo $info['phn'];?>" class="wu-bg color-wht"><i class="fa fa-whatsapp"></i><span>MESSAGE ME NOW</span></a>
					<a href="mailto:<?php echo $info['email']; ?>" class="bg-brn"><i class="fa fa-envelope"></i><span>EMAIL ME NOW</span></a>
					<a href="tel:<?php echo $info['phn']; ?>" class="bg-blu color-wht"><i class="fa fa-phone"></i><span>CALL ME NOW</span></a>
				</div>
			</div>
			<h2 class="color-wht"><?php echo $info['desc']; ?></h2>
			<p class="hero">This is the homepage hero section rendered by a theme div placed within the front-page.php file.</p>
		</div>
		<img src="<?php echo $info['uri'].'/images/hero-side-img-670x800.jpg'; ?>" class="hero-side-img" alt="<?php echo $info['name']; ?>">
	</div>

	<style>
		.front-hero {width:100%;overflow:hidden;}
		img.hero-img {
			top:44px;
			width:100%;
			height:1080px;
			object-fit:cover;
			filter:blur(7px) brightness(28%);
		}
		.hero-content-wrap {
			position:absolute;
			display:flex;
			justify-content:center;
			align-items:center;
			top:200px;
			width:100%;
		}
		.hero-content-wrap img {
			height:auto;
			border-radius:20px;
			box-shadow:3px 3px 6px #222;
		}
		img.hero-side-img {
			position:absolute;
			filter:brightness(0.5);
			width:670px;
			margin-left:180px;
		}
		.hero-content {text-align:left;z-index:2;}
		.hero-content img.face {
			width:300px;
			display:block;
			position:relative;
		}
		.hero-content h1 {margin-top:18px;}
		.hero-content h2 {margin-bottom:30px;}
		.hero-content p {
			font-size:18px;
			width:440px;
			line-height:1.3;
		}
		.img-btns-wrap {
			display:flex;
			justify-content:space-between;
			align-items:center;
			flex-wrap:nowrap;
			width:855px;
		}
		.btns-wrap {
			display:block;
			position:relative;
			margin:auto 30px auto 0;
		}
		.btns-wrap a {
			display:block;
			padding:7px 10px;
			margin:15px 0;
			border:solid #fff 2px;
			border-radius:10px;
			width:272px;
			text-align:left;
			box-shadow:3px 3px 6px #222;
		}
		.btns-wrap a:first-child {margin-top:0;}
		.btns-wrap a:hover, .btns-wrap a:focus {color:black;}
		.btns-wrap i {font-weight:600;font-size:22px;}
		.btns-wrap a span {
			position:absolute;
			width:200px;
			margin-top:3px;
			text-align:center;
		}
		.color-wht {color:white;}
		.bg-lt-blu {background:#cadbe9;}
		.wu-bg {background:#00A884;}
		.bg-brn {background:#E9D7C9;}
		.bg-blu {background:#467ca9;}

		/* Hero media queries
		------------------------- */

		@media (max-width: 940px) {
			.hero-content-wrap {top:180px;}
			img.hero-side-img {margin-left:0;}
			.hero-content {margin-right:0;text-align:center;}
			.hero-content h1 {width:406px;margin:0 auto 40px;}
			.hero-content p {margin:auto;}
			.img-btns-wrap {width:670px;justify-content:space-evenly;}
			.btns-wrap {margin:auto 0;}
		}
		@media (max-width: 745px) {
			.hero-content h1 {margin-bottom:20px;}
			img.hero-side-img {width:473px;top:400px;}
			.hero-content h2 {width:320px;margin:20px auto 20px;}
			p.hero {width:380px;font-size:16px;}
			.img-btns-wrap {width:380px;margin:auto;flex-wrap:wrap;}
			.btns-wrap a:first-child {margin-top:20px;}
			.hero-content img.face {margin-bottom:30px;width:180px;}
			.hero-content-wrap {top:140px;}
		}
		@media (max-width: 479px) {
			img.hero-side-img {width:500px;top:350px;}
			.hero-content h1 {font-size:39px;}
			.hero-content h2 {font-size:30px;}
			.hero-content p {width:250px;}
		}
	</style>
</section>
After pasting this HERO-SECTION theme div into your WordPress front-page.php file, update the text, create and add your images, modify your CSS and then move your CSS to a CSS file of your choice. To begin, update the text within the theme div <p></p> element describe what you offer in a compelling way.
Create your hero-section theme-div images
Thoroughly read through the above hero-section theme div and note the image filenames. As you’ll see, each filename contains the dimensions in pixels. Therefore, create images that match the dimensions perfectly and save them in your theme’s /images folder. Also, use the exact filenames used in the hero-section theme div.
Modify your CSS located in the STYLE element
If you’ve created your own color classes, use them where applicable. Otherwise, change the colors within the theme div itself to match your design. Then, modify the brightness for two images to provide the right amount of contrast: background image and side image. All text must contrast well.
Move your CSS to a proper CSS file
Once your CSS is complete, transfer all CSS to your WordPress front-page.css file or another CSS file, depending on how you organize your CSS. This theme div functions like a self-contained plugin with its own CSS. But, your theme performs better when CSS resides in its own file and the <style></style> element is removed.
Below-the-fold WordPress front-page.php
Now that everything above the fold is complete, your header and hero section, let’s add some theme divs that website visitors can scroll down to see. To clarify, if you’ve captured their attention at the top, chances are higher that they’ll scroll down for more.
Add many types of sections below the fold, depending on they type of website you’re creating. Although, there are some common types of section that work in almost any type of WordPress theme. As such, let’s add three of them: your bio section, a latest-posts section, and an image slider. Then for a bonus, add a text with heading section to place between them.
WordPress front-page.php BIO theme div
To continue building this WordPress front-page.php file, let’s plug in a BIO theme div, which is a row that presents info about you and your company – your bio section. On the left is your picture and the right side reveals some info about you and your contact information, as shown below:

Paste the following BIO theme div right below your HERO-SECTION theme div, under the </section> closing tag :
<section class="bio">
<div class="bio-wrap">
<div class="bio-pic">
<img src="<?php echo $info['uri'].'/images/bio-pic-300x300.jpg'; ?>" alt="<?php echo $info['name']; ?>">
</div>
<div class="vert-line"></div>
<div class="bio-info">
<h2><?php echo $info['name']; ?></h2>
<p>Replace this text with first paragraph in your About page. Paste the paragraph into the excerpt box on the right side of the page editor in the Dashboard. After this text lies a PHP function calling the excerpt. Delete this text after saving your About page with an excerpt. <?php echo get_the_excerpt('Page ID# goes here'); ?></P> <!-- Get the page ID from the page URL when editing the About page -->
<p>
<a href="tel:<?php echo $info['phn']; ?>">
<i class="fa fa-phone"></i> Phone: <?php echo $info['phn']; ?>
</a>
</p>
<p>
<a href="mailto:<?php echo $info['email']; ?>">
<i class="fa fa-envelope"></i> Email: <?php echo $info['email']; ?>
</a>
</p>
</div>
</div>
<style>
.bio-wrap {
background:hsla(201,100%,6%,1);
background:linear-gradient(0deg,hsla(201,100%,6%,1) 0%,hsla(201,33%,17%,1) 20%,hsla(201,33%,17%,1) 80%,hsla(201,100%,6%,1) 100%)!important;
display:flex;flex-wrap:wrap;
justify-content:space-evenly;
align-items:center;
min-height:400px;
color:white;
}
.bio-pic {
position:relative;
width:500px;
margin:30px auto;
}
.bio-pic img {
display:block;
border-radius:50%;
margin:auto;
}
.vert-line {height:270px;border-right:solid 2px #12252F;}
.bio-info {width:500px;margin:auto;}
.bio-info h2 {margin:16px 0;}
.bio-info a {color:lightblue;}
.bio-info a:hover {color:lightgray;}
@media (max-width: 1100px){.bio-wrap .vert-line {display:none;}}
@media (max-width: 1016px){.bio-wrap {text-align:center;padding-bottom:20px;}}
@media (max-width: 520px){.bio-wrap {padding:0 10px 20px;}}
</style>
</section>
Notice the paragraph followed by a <?php - ?> session within the <p></p> element of your bio info <div>. The paragraph adds temporary content while the PHP session provides future content from your About page.
This PHP code uses a WordPress function to load your page excerpt. In the WordPress page editor, paste an expert, like from the first paragraph, save it, and reload your homepage. You’ll see that excerpt show up. Be sure to delete the temporary paragraph after entering an excerpt in the page editor.
Walk through each WordPress function in your BIO theme div of your WordPress front-page.php file:
get_the_excerpt()retrieves the post excerpt using the post ID – find the ID in the URL of the post editor$info['phn']loads the value within the phn array key of the$infoarray
Just like your HERO-SECTION theme div, modify your CSS to match your theme design. Then, create your image to match the dimensions in the filename. After that, edit the text, which is usually from the first paragraph of your About page, along with your contact info. Finally, move your CSS to front-page.css and delete the <style></style> element from the theme div.
To quickly define the colors within your gradient, check out Coolors Gradient Maker. There, just enter some colors and move the sliders until you get it right. Then, use their CSS tool to get the parameters.
WordPress front-page.php LATEST-POSTS theme div
It’s always a good idea to display your latest posts on your homepage. As such, paste in this LATEST-POSTS theme div below the </section> closing tag of the BIO theme div in your WordPress front-page.php file:
<section class="latest-posts">
<h2 class="latest-posts-heading">Latest Posts</h2>
<?php
$args=array(
'posts_per_page' => 5,
'post_type' => 'post'
);
$i=1;$wordcount=18;$topwordcount=39; // # of words in each excerpt and top excerpt
$query = new WP_Query($args); // Define the $query
if ($query->have_posts()) { // Check if posts exist
while ($query->have_posts()) { // While posts exist
$query->the_post(); // Query the post in the iteration from 1 to 5 as set in $query
if ($i==1) { ?> <!-- The following is for the first post on top and bigger when $i equals 1 -->
<div class="post-row left top-post">
<div class="post-img-col">
<a href="<?php the_permalink() ?>"> <!-- Function pulls the link to the post -->
<?php the_post_thumbnail('medium-entry-image'); ?> <!-- Function pulls the "medium-entry-image" sized featured imaged defined in functions.php -->
</a>
</div>
<ul class="post-col">
<li>
<h2 class="blog-title"><a href="<?php the_permalink() ?>" class="font-wht-teal"><?php the_title(); ?></a></h2> <!-- Pulls the link to the post again -->
<p><?php echo wp_trim_words(get_the_content(),$topwordcount,'...'); ?><a href="<?php the_permalink() ?>"> READ MORE</a></p> <!-- Creates an excerpt with from the content and adds "READ MORE" link - # of words set by $wordcount variable -->
</li>
</ul>
</div><?php
}
else { // Put all following posts below:
if ($i % 2 == 0) { ?> <!-- All even numbered posts -->
<div class="post-row-wrap">
<div class="post-row left">
<div class="post-img-col">
<a href="<?php the_permalink() ?>">
<?php the_post_thumbnail('small-entry-image'); ?>
</a>
</div>
<ul class="post-col">
<li>
<h2 class="blog-title"><a href="<?php the_permalink() ?>"><?php the_title(); ?></a></h2>
<p><?php echo wp_trim_words(get_the_content(),$wordcount,'...'); ?><a href="<?php the_permalink() ?>"> READ MORE</a></p>
</li>
</ul>
</div><?php
}
else { ?> <!-- All odd numbered posts -->
<div class="post-row right">
<ul class="post-col">
<li>
<h2 class="blog-title"><a href="<?php the_permalink() ?>"><?php the_title(); ?></a></h2>
<p><?php echo wp_trim_words(get_the_content(),$wordcount,'...'); ?><a href="<?php the_permalink() ?>"> READ MORE</a></p>
</li>
</ul>
<div class="post-img-col">
<a href="<?php the_permalink() ?>">
<?php the_post_thumbnail('small-entry-image'); ?>
</a>
</div>
</div>
</div> <?php
}
}
$i++;
}
if ($i % 2 !== 0) { ?></div><?php } // Add closing </div> tag for 'post-row-wrap' if less than 5 posts and ends on even number (2 or 4)
wp_reset_postdata(); // Restore original Post Data in the loop
} ?>
<style>
.latest-posts {
padding:80px;
color:white;
background:#4D4848;}
h2.latest-posts-heading {
display:block;
text-align:center;
margin:0 0 80px;
font-size:60px;
}
.latest-posts li {list-style-type:none!important;}
.latest-posts .post-row-wrap {
display:flex;flex-wrap:wrap;
justify-content:space-between;
width:1200px;
margin:20px auto;
}
.latest-posts .post-row {
border-radius:20px;
display:flex;align-items:center;
background:#333;
width:49.2%;
box-shadow:3px 3px 6px #222;
}
.latest-posts .top-post.post-row {width:1200px;margin:auto;}
.latest-posts .post-row h2 {
margin:0 0 5px;
font-size:22px;
line-height:1;
}
.latest-posts .top-post.post-row h2 {
display:inline-block;
font-size:36px;
margin-bottom:10px;
}
.latest-posts .post-row p {margin:0;font-size:16px;}
.latest-posts .top-post.post-row p {font-size:23px;}
.latest-posts .post-row a {display:inline-block;color:lightblue;}
.latest-posts .post-row a:hover {color:lightgray;}
.latest-posts .post-col {padding:0 20px;margin:0;}
.latest-posts top-post .post-col {padding:0 20px;}
.latest-posts .post-img-col img {transition:.2s ease;margin-bottom:-6px;}
.latest-posts .left img {border-radius:20px 0 0 20px;border-right:solid 1px #fff;}
.latest-posts .right img {border-radius:0 20px 20px 0;border-left:solid 1px #fff;}
.latest-posts .post-img-col img:hover {transition:.2s ease;border:none;}
</style>
</section>
This LATEST POSTS theme div uses PHP code to open the blog loop and automate what it renders. In other words, it pulls the latest posts from your blog and renders the five latest posts. It does this in a similar manor to your home.php file when you open your blog.
Walk through each PHP expression and WordPress function in the above LATEST-POSTS theme div:
- An
$argsarray is declared with the following data to be used inWP_Query()defined below:'posts_per_page' => 5sets the number of posts to render'post_type' => 'post'sets the post type to blog post
$the_query = new WP_Query($args);defines the Query with theWP_Query()WordPress Query classif ($query->have_posts()) {checks if posts existhave_posts()determines whether current WordPress query has posts to loop over
$query->the_post();queries the post in the iteration from 1 to 5 as set in $queryif ($i==1) {creates the larger top post when$iequals 1if ($i % 2 == 0) {creates all even numbered posts positioned on the leftif ($i % 2 !== 0) { ?></div><?php }adds closing </div> for ‘post-row-wrap’ if less than 5 posts and even number of posts
WordPress front-page.php IMAGE-SLIDER custom post type
Although image sliders come in all sorts of sizes and design styles, typically from a plugin, they’re a simple to create yourself. In this WordPress front-page.php IMAGE-SLIDER theme div, the image slider is a fairly simple version. But after you paste it, study it, and play with the code, modify it to suite your design needs.
For this theme div, code must be added to your functions.php file to add a custom post type called Image Slider using the slug image-slider. This allows you to add image and content for each slide within posts. The slider uses your featured image for the slide and displays the post title and content in front of it.
After you add the following PHP to your functions.php file, the words “Image Slider” will appear on the left column in your WordPress Dashboard. This post type is a blog loop used exclusively for your IMAGE-SLIDER theme div. Each post is a single image slide with a title, content, and an excerpt.
The following PHP code goes into your functions.php file to create your image-slider custom post type:
// Create post type "image-slider" - This function is for front-page.php image-slider theme div
add_action( 'init', 'create_posttypes' );
function create_posttypes() {
	register_post_type('image-slider',
	// CPT Options
		array(
			'labels'        => array(
			'name'          => __('Image Slides'),
			'singular_name'	=> __('Image Slide')
			), // Closes the array within this array
			'public'        => true,
			'hierarchical'  => true,
			'has_archive'   => true,
			'rewrite'       => array('slug' => 'image-slider'),
			'show_in_rest'  => true,
			'supports'      => array(
			'title','editor','thumbnail','revisions',
			'custom-fields','excerpt','page-attributes'
			), // Closes the array within this array
			'menu_position' => 4
		)
	);

// Adds new featured image sizes by pixels - horizontal px, vertical px
add_image_size('slide-entry-image',900,380,true); // Put this with your other add_image_size() statements
IMPORTANT: After pasting and saving the above theme div into functions.php, go to your WordPress Dashboard or refresh the page if already there. Then, reset your permalinks by going to Settings > Permalinks and hitting Save. In WordPress, this is the only way to get it to recognize custom post type permalinks.
Walk through the above PHP code added to your functions.php file:
add_action( 'init', 'create_posttypes' );WP function that adds the callback ‘create_posttypes; function to an action hookregister_post_type('image-slider'registers a new post type called ‘image-slider’ so each image with content can be added like a postadd_image_size('slide-entry-image',900,380,true);registers a new image size for post featured images sized for the slider theme div
Now that you have the image-slider post type in your left-side column in the WordPress Dashboard panel, create some temporary slides to test your slider. Use Lorem Ipsum text after typing a unique paragraph for each slide. Then, enter that unique paragraph into the Excerpt box in the right-side column.
WordPress front-page.php IMAGE-SLIDER theme div
Paste the following IMAGE-SLIDER theme div below your LATEST-POSTS theme div </section> closing tag:
<section class="image-slider">
	<div class="container">
		<div class="row">
			<div class="col-xs-12">
				<div id="carousel" class="carousel slide" data-ride="carousel" data-type="multi" data-interval="3000">
					<div class="carousel-inner">
						<?php
						$args = array(
							'post_type'	=> 'image-slider', // Post type created in functions.php
							'order'		=> 'ASC'
						);
						$i=0;
						$the_query = new WP_Query($args);
						if ($the_query->have_posts()) : while ($the_query->have_posts()) : $the_query->the_post();
							if ($i == 0) { ?><div class="item active"><?php } else {?><div class="item"><?php } ?>
								<a href="<?php the_permalink(); ?>" class="carousel-col">
									<?php the_post_thumbnail('slide-entry-image'); ?>
									<div class="slide-text">
										<h2><?php the_title(); ?></h2>
										<?php the_excerpt(); ?>
									</div>
								</a>
								</div><?php
							$i++;
						endwhile; endif;?>
					</div>
					<!-- Controls -->
					<div class="left carousel-control">
						<a href="#carousel" role="button" data-slide="prev">
							<i class='fa fa-chevron-left'></i>
						</a>
					</div>
					<div class="right carousel-control">
						<a href="#carousel" role="button" data-slide="next">
							<i class='fa fa-chevron-right'></i>
						</a>
					</div>
				</div>
			</div>
		</div>
	</div>
	<script src="https://code.jquery.com/jquery-3.2.1.min.js"></script><!-- Slider code -->
	<script src="https://maxcdn.bootstrapcdn.com/bootstrap/3.3.7/js/bootstrap.min.js"></script><!-- Slider code -->
	<script src="https://themedivs.image-slider.js"></script><!-- Theme div slider code -->
	<style>
		.image-slider {
			padding:60px 0;
			height:500px;
			background:lightblue;
		}
		.image-slider .container {
			padding-right:15px;
			padding-left:15px;
			margin-right:auto;
			margin-left:auto;
		}
		.image-slider .row {margin-right:-15px;margin-left:-15px;}
		.image-slider .col-xs-12 {
			position:relative;
			min-height:1px;
			padding-right:15px;
			padding-left:15px;
			float:left;
			width:100%
		}
		.carousel {position:relative;}
		.carousel.slide {
			width:899px;
			margin:0 auto;
			height:380px;
		}
		.carousel-inner {
			width:898px;
			height:380px;
			position:relative;
			width:100%;
			overflow:hidden;
			border-radius:20px;
			box-shadow:3px 3px 6px #222;
			transition:.2s ease;
		}
		.carousel-inner:hover {filter:brightness(85%);transition:.2s ease;}
		.carousel-inner .slide-text {
			position:absolute;
			background:rgba(0,0,0,.5);
			padding:20px;
			bottom:0;
			color:white;
			width:450px;
		}
		.carousel-inner>.item {position:relative;display:none;transition:.6s ease-in-out left;}
		.carousel-inner>.active,.carousel-inner>.next,.carousel-inner>.prev {display:block;}
		.carousel-inner>.active{left:0}
		.carousel-inner>.next,.carousel-inner>.prev {position:absolute;top:0;width:100%;}
		.carousel-inner>.next {left:100%;}
		.carousel-inner>.prev {left:-100%;}
		.carousel-inner>.next.left,.carousel-inner>.prev.right {left:0;}
		.carousel-inner>.active.left {left:-100%;}
		.carousel-inner>.active.right {left:100%;}
		.item.active {min-height:380px;}
		.carousel-col {
			position:relative;
			min-height:380px;
			padding:0;
			float:left;
			border-right:solid 1px white;
		}
		.carousel-col p {font-weight:400;}
		.carousel-col h2, .carousel-col h3, .carousel-col p:first-of-type {margin:5px;font-weight:600;}
		.carousel-col h2 {font-weight:800;}
		.carousel-col:hover .team-thumbnail:after {
			content:"";
			display:block;
			position:absolute;
			left:35px;
			top:30px;
			height:160px;
			width:160px;
			animation:pulseLine 2s linear infinite;
			animation-delay:.5s;
		}
		.carousel-control {
			position:absolute;
			background-image:none!important;
			display:flex;
			justify-content:center;
			align-items:center;
			opacity:1;
			width:0px;
		}
		.carousel-control.left {left:-120px!important;}
		.carousel-control.right {right:-120px!important;}
		.carousel-control > a > span {color:white;}
		.carousel-control i {font-size:36px!important;color:#333!important;}
		.carousel-control {position:absolute;top:0;bottom:0;left:0;width:15%;font-size:20px;color:#fff;text-align:center;text-shadow:0 1px 2px rgba(0,0,0,.6);filter:alpha(opacity=50);opacity:.5;}
		.carousel-control.right {right:0;left:auto;}
		.carousel-control:hover,.carousel-control:focus {color:#fff;text-decoration:none;filter:alpha(opacity=90);outline:0;opacity:.9;}
		.image-slider .active > div {display:none;}
		.image-slider .active > div:first-child {display:block;}
	</style>
</section>
As you can see when you walk through the above code, this IMAGE-SLIDER theme div functions in the same way as your LATEST POSTS theme div. The primary difference is the post type. Your latest posts come from your standard post type and the slides come from the image-slider post type created in your functions.php file. Then, three scripts are loaded for the slider functionality.
Simple front-page.php HEADING-TEXT theme div
This WordPress front-page.php HEADING-TEXT theme div is very simple. It reveals important info like your amazing features in a brief and concise way. Also, it acts like a visual divider between sections.
Sometimes, stack more than one or add additional paragraphs to suite your needs. When stacking them, try different backgrounds for visual separation. One effective way to do this is to use one color in slightly different shades (darker versions) or tints (lighter versions).
The following HEADING-TEXT theme div contains two equal theme divs, or sections. Copy and paste one or both, use together or in separate locations between other theme divs. Simply remove the entire <style></style> element and its CSS in the second <section> to make them both the same color.
<section class="heading-text">
	<h2>AMAZING FEATURES OFFERED</h2>
	<p>In this paragraph, write some great copy about the amazing features of your products and services. Additional paragraphs can work well if they're short and to-the-point. But of course, one paragraph is best if you don't need to reveal more of your amazing features here.</p>
	<style>
		.heading-text {
			text-align:center;
			padding:40px;
			color:#457188;
			background:white;
		}
		.heading-text h2 {display:block;}
		.heading-text p {
			max-width:680px;
			margin:40px auto;
			min-width:280px;
			}
	</style>
</section>

<section class="heading-text heading-2"> <!-- Additional class added for background change in CSS below -->
	<h2>ADDITIONAL FEATURES OFFERED</h2>
	<p>In this paragraph, write about your additional amazing product and service features.  Additional paragraphs can work well if they're short and to-the-point.  But of course, one parapraph is best if you don't need to reveal more of your amazing features.</p>
	<style> /* Since the sections class name "heading-text" is the same, all previous CSS applies here */
		.heading-text.heading-2 {background:#f8f8f8;} /* Override the background set in the previous heading-text section */
	</style>
</section>
Now that you’ve completed your WordPress front-page.php file, be sure to fully test everything on your homepage. From your header down to your footer, everything should render correctly and function properly. In fact, be sure to test every link by clicking on each one. Once it all works, congratulations! You now know how to use theme divs to build a web page. Uncover more theme divs by clicking on Guides in the menu.