How to make a WordPress theme from scratch piece-by-piece
If you enjoy modifying WordPress themes, sometimes pasting pieces of code from online resources and you hope to eventually build your own WordPress themes, you’re in the right place. In this tutorial, I’ll show you how to make a WordPress theme from scratch, piece-by-piece using blocks of code called theme divs.
A theme div is like a plugin without the overhead and poor performance. Simply paste theme divs into specified locations throughout your theme files, learning as you go. These are self contained, interchangeable code modules. Also, each theme div contains CSS to customize for your design – with instructions. Slowly but surely, learn how to make a WordPress theme yourself without the stress.
The WordPress theme template I provide contains the outer theme framework for your Theme Divs. Then, plug in the various theme divs, one for each section, to bring your website to life. You’ll uncover how PHP, HTML, CSS, and JAVA work together to produce a beautiful, high-performance website. And you won’t need to have coding knowledge to build your own WordPress themes.
Now, continue reading to uncover how to make a WordPress theme using plug-and-play theme divs, some surrounding code, piece-by-piece with a template.
How I learned to make a WordPress theme
Never happy with a given WordPress theme – always making improvements, changes, and adjustments, I rummaged online for pieces of code for this and that. Slowly, I learned how to create a great WordPress theme by modifying an existing one using PHP, HTML, CSS, and JAVA. During the process, I uncovered how the code works with practice and tons of online training ever since 2014.
Over time, I learned to keep an organized set of theme divs to use like plugins, each pasted into theme files. This method allowed me to build websites much faster while having total control over the design. Now that I have an amazing library of theme divs, I’ll share them with you to make your job easier and better and to reduce your stress throughout your learning curve.
Today, I build my own WordPress themes from scratch, without theme builders and without plugins – with a few exceptions. As such, I have the freedom to build a website within WordPress exactly how I want it. In fact, WordPress websites built using theme divs are flexible, they load faster, perform better, and rank well with search engines – SEO.
Why learn how to make a WordPress theme?
This question is easy to answer because there are so many great answers to choose from, both on the back end and the front end of your website. To explain, your website and data are stored in the back end – your server and database. The front end is what you see in the browser – the UI (User Interface).
Although you can build amazing websites from scratch without WordPress, two things make WordPress outstanding. First, WordPress has the best CMS (Content Management System) in the world. Second, it provides an extensive set of pre-made PHP functions, greatly reducing the amount of coding required.
In this tutorial, learn how to make a WordPress theme from scratch, piece-by-piece. I’ll provide the template and various theme divs to paste in for each section along with some surrounding code. Just paste and modify them for your own design – I’ll show you how.
Start with website hosting and your code editor
There are three rules I live by regarding website development: high performance, simplicity, and low cost. First, your website must load fast and perform well. Then, everything but web hosting should be free. Why pay for something when you can make it yourself or get it for free, right?
Regarding web hosting, I use DreamHost. I’ve been using them since 2014 and love their service, performance, and prices. For my code editor, I use Notepad++ since it’s both free and very powerful. Also, WordPress is free. DreamHost and most other web hosting platforms provide free and easy WordPress installations.
For an explanation of how to set up DreamHost, click DREAMHOST SETUP. If you don’t already use a code editor and would like to use Notepad++, click NOTEPAD++ DOWNLOADS to pick the latest version, download and install it. For Notepad++ instructions, click NOTEPAD++ MANUAL.
Connect your code editor to your host provider
The following steps are performed in Notepad++ using DreamHost. Fortunately, these steps are similar to other code editors and hosting providers.
Now, connect your Notepad++ code editor to your DreamHost or other hosting provider using the following instructions:
Install the NppFTP extension
- Start Notepad++
- Select Plugins > Plugin Manager > Show Plugin Mgr
- Select NppFTP
- Click on Install
![]()
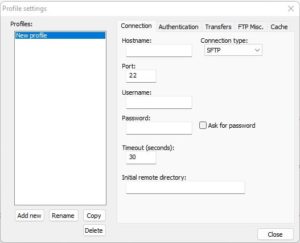
Create profile with your FTP access data:
- Select Plugins > NppFTP > Show NppFTP Window
- Click thegear iconshown on the right on top
- Select Profile settings
- In the Profiles section, click Add new
- Enter your desired profile name
- Click on Close to save the profile
- On the Connection tab, enter your FTP data
In DreamHost, select SFTP as your connection type and use enter Port 22. Then, enter your FTP username and password created in your hosting provider. Click FTP USER for instructions in DreamHost.
After creating your profile, click on the connect icon shown on the right to connect to it. Then select your profile when it pops down. This reveals the folders within your profile.
![]()
Overview on how to make a WordPress theme
To begin, WordPress themes are made up of various PHP files. But if you’re new to PHP, no worries – I’ll make it easy. These files are easy to assemble using the theme divs I provide. Think of these files as your canvas to paint your own WordPress theme. I’ll show you the basic steps with instructions on how to modify each part.
To download the template, which contains all the empty theme PHP files, click THEME TEMPLATE. Just download the zip file and upload it to WordPress Appearance > Themes. Better yet, follow the next steps to build it yourself. You’ll understand each component much better if you walk through it at least once.
At the bottom of this page, I provide a link to the entire starter theme, which contains everything presented here. Although I recommend pasting in every them div yourself for experience, studying and modifying each file is also effective, which you’ll do either way.
Where to build your WordPress theme
Many website developers use a local server within their computer to build websites before publishing them online. In my experience, local servers slow down your computer and are not necessary. Since SEO takes months and months, nobody will see your work while you develop your site live unless you provide them with a link.
Before you begin, register your website domain name: yourwebsite.com. Next, register your subdomain: theme.yourwebsite.com. Subdomains are free when using DreamHost along with most other host providers. Finally, install WordPress on your subdomain so you can build your theme.
After you’ve completed your entire theme, zip your theme and install WordPress on your main web address: yourwebsite.com, your theme’s final destination.
After installing your new theme on yourwebsite.com, test every part of it to confirm all functionality. Then, create content for your new website like posts and pages. This is when you yell “IT’S ALIVE!”
How to make a WordPress theme from scratch
Now let’s build your theme template, which contains the essentials. Some of these essentials, like your menu, use theme divs that are interchangeable. Once you fully assemble your theme, either modify the given theme divs or change them out with theme divs from our extensive theme-div library.
Start by creating your empty theme folders. In your Notepad++ profile, click on the arrow next to your website URL in the folders. Then, navigate all the way to your themes folder using the following path:
yourwebsite.com > wp-content > themes
Next, right click on the themes folder and click create new directory. Using hyphens in the name for spaces, enter the name of your theme to name this folder:
my-new-theme-name
Create blank theme files and folders
Now let’s create sub-folders for your theme files. Right click your-new-theme-name folder and click create new folder. Do this multiple times to create each of the following folders within your themes folder:
- CSS
- images
- includes
- js
After creating those folders, create the blank PHP and CSS files for your theme in your my-new-theme-name directory. Right click your theme folder again and click create new file. Do this multiple times to create each of the following file names:
- style.css
- functions.php
- home.php
- front-page.php
- single.php
- index.php
- page.php
- header.php
- footer.php
Next, let’s create blank CSS, PHP, and JS files within the folders you previously created. Right click on each of your theme folders and click create new file. Do this multiple times to create each of the following files for each of the folder names:
- Folder: CSS >File: home.css
- Folder: CSS >File: front-page.css
- Folder: CSS >File: single.css
- Folder: CSS >File: page.css
- Folder: CSS >File: header.css
- Folder: CSS >File: footer.css
- Folder: js >File: scripts.js
- Folder: includes >File: admin.php
Finally, create a PHP file called contact.php in your domain root directory. Right click your domain folder and click on create new file. This file handles your contact form submissions by emailing you the data entered into it. Later, this file can send the data to an email-list service like MailChimp.
Create your theme screenshot image file
You’ll need an image file called screenshot.jpg so your theme will have an image associated with it when selecting your new theme in WordPress. Improve this image in the future. But to start, just make a basic image using Paint or another image editor. NOTE: this image file isn’t necessary, so skip this step and create it later if you prefer.
In Paint, set the blank canvas to 1200px x 900px. Then, either leave the background white or fill it with a color. Lastly, paste in your logo and/or add text with your theme name and a description. When your theme is complete, you can create a new screenshot image file from an actual screenshot or just leave it with a logo and description.
Add initial content to enable your WordPress theme
Now let’s add the necessary content to your theme files so your theme will show up in your WordPress Dashboard panel. Only two items are required for your theme to show up in Appearance > Themes:
- Header comment section in style.css to display minimum information about the theme
- index.php file must exist even if it’s an empty file, which you’ve already created
Although the header comment section at the top of style.css can display much more information, the minimum required data is included here – click STYLE.CSS to learn more. Also required, index.php loads when the requested file doesn’t exist. Note that WordPress only looks to see if it is there, it doesn’t check the contents. As such, your theme will show up in the Dashboard even when it’s blank.
In Notepad++ or another code editor, double click on style.css to open the blank file. Then, paste in the following comment and initial CSS:
/**
* Theme Name: Your Theme Name
* Author: Your name
* URI: https://yourwebsite.com/
* Description: My new WordPress theme
* Version: 1.00
* Author URI: https://yourportfoliowebsite.com
*/

/* normalize.css v8.0.1 | MIT License | github.com/necolas/normalize.css
---------------------------------------------------------------------------- */
/* This is a standard normalization always recommended */
html{line-height:1.15;-webkit-text-size-adjust:100%}body{margin:0}main{display:block}h1{font-size:2em;margin:.67em 0}hr{box-sizing:content-box;height:0;overflow:visible}pre{font-family:monospace,monospace;font-size:1em}a{background-color:transparent}abbr[title]{border-bottom:none;text-decoration:underline;text-decoration:underline dotted}b,strong{font-weight:bolder}code,kbd,samp{font-family:monospace,monospace;font-size:1em}small{font-size:80%}sub,sup{font-size:75%;line-height:0;position:relative;vertical-align:baseline}sub{bottom:-.25em}sup{top:-.5em}img{border-style:none}button,input,optgroup,select,textarea{font-family:inherit;font-size:100%;line-height:1.15;margin:0}button,input{overflow:visible}button,select{text-transform:none}[type=button],[type=reset],[type=submit],button{-webkit-appearance:button}[type=button]::-moz-focus-inner,[type=reset]::-moz-focus-inner,[type=submit]::-moz-focus-inner,button::-moz-focus-inner{border-style:none;padding:0}[type=button]:-moz-focusring,[type=reset]:-moz-focusring,[type=submit]:-moz-focusring,button:-moz-focusring{outline:1px dotted ButtonText}fieldset{padding:.35em .75em .625em}legend{box-sizing:border-box;color:inherit;display:table;max-width:100%;padding:0;white-space:normal}progress{vertical-align:baseline}textarea{overflow:auto}[type=checkbox],[type=radio]{box-sizing:border-box;padding:0}[type=number]::-webkit-inner-spin-button,[type=number]::-webkit-outer-spin-button{height:auto}[type=search]{-webkit-appearance:textfield;outline-offset:-2px}[type=search]::-webkit-search-decoration{-webkit-appearance:none}::-webkit-file-upload-button{-webkit-appearance:button;font:inherit}details{display:block}summary{display:list-item}[hidden],template{display:none}

/* Float Clearing
--------------------------------------------- */

.author-box::before, .clearfix::before, .entry::before, .entry-content::before, .footer-widgets::before, .nav-primary::before, .nav-secondary::before, .pagination::before, .site-container::before, .site-footer::before, .site-header::before, .site-inner::before, .widget::before, .wrap::before {content: " ";	display: table;}
.author-box::after, .clearfix::after, .entry::after, .entry-content::after, .footer-widgets::after, .nav-primary::after, .nav-secondary::after, .pagination::after, .site-container::after, .site-footer::after, .site-header::after, .site-inner::after, .widget::after, .wrap::after {clear: both; content: " "; display: table;}
This style.css content defines your theme with the header comment section at the top. Then, it sets some standard formatting for your entire website. This initial CSS is recommended for all websites:
- Normalize CSS forces consistent and standardized browser rendering of all elements
- Float clearing sets whether elements are moved below preceding floating elements
That’s it! Now you have a WordPress theme template – a blank canvas. The comment at the top is read by WordPress and may contain even more information. Be sure to hit save to update the file. This template will now activate in WordPress, but don’t do that yet since there’s no content.
Comment symbols in different languages
Comments within each language (CSS, HTML, PHP, and JAVA) use different symbols to signify them. Below is a quick reference:
//is used for PHP comments – everything after this on the same line is a comment/*signifies both PHP and CSS comments within/* and */and can span multiple lines<!--is an HTML comment within<!-- and -->and can span multiple lines
Next, get the most-important building blocks for your website. These building blocks are standard theme divs and some surrounding code to paste into your theme files. To explain, they provide your website with a menu, page functionality, and more.
functions.php adds & adjusts site functionality
In WordPress, your functions.php file automatically loads when your website opens. From website functionality to WordPress Dashboard-panel customization, functions.php is quite useful. The PHP code within it does two things:
-
- Adds or removes built-in WordPress features or functionality
- Changes default WordPress features on your website
Be sure to read through the comments placed throughout the content explaining each function. Now, open your empty functions.php file and paste the following PHP code:
<?php // FUNCTIONS.PHP

/**
* Your Theme Name's functions and definitions
* @package your-theme-name
* @since your-theme-name 1.0
*/

// Enqueue styles and scripts - points to all theme files used
add_action('wp_enqueue_scripts','theme_files'); // Activate the following function
function theme_files() {
	wp_enqueue_style('main_styles',get_stylesheet_uri());
	wp_enqueue_style('footer_styles',get_theme_file_uri('/css/footer.css'));
	wp_enqueue_style('front-page_styles',get_theme_file_uri('/css/front-page.css'));
	wp_enqueue_style('header_styles',get_theme_file_uri('/css/header.css'));
	wp_enqueue_style('blog_loop_styles',get_theme_file_uri('/css/home.css'));
	wp_enqueue_style('page_styles',get_theme_file_uri('/css/page.css'));
	wp_enqueue_style('blog_post_styles',get_theme_file_uri('/css/single.css'));
	wp_enqueue_style('font-awesome','//maxcdn.bootstrapcdn.com/font-awesome/4.7.0/css/font-awesome.min.css');
	wp_enqueue_style('custom-google-fonts','//fonts.googleapis.com/css2?family=Montserrat:ital,wght@0,400;0,600;0,800;1,400;1,600;1,800;&display=swap" rel="stylesheet');
	wp_enqueue_script ('custom-script',get_theme_file_uri('/js/scripts.js'));
}
So far, your functions.php file contains a header comment section and one function that points to theme files and external resources. At the top, <?php opens a PHP session. As such, everything between <?php and ?> is pure PHP code. When a file ends with PHP, as in this case, the closing ?> isn’t needed.
Walk through each WordPress function and PHP expression in your functions.php file:
add_action()adds the functiontheme_files()to an action hookwp_enqueue_style()function enqueues a CSS stylesheet in your theme or externallywp_enqueue_script()enqueues a script file in your theme
Add additional functions.php content
Now, add more custom functions to your functions.php file. The first function points to admin.php, which is used for all WordPress Dashboard customizations. In this case, admin.php will create custom fields in Settings > General of your WordPress Dashboard panel.
Paste the following PHP code at the bottom of your functions.php file:
// Add Admin.php from includes folder - creates custom fields in Dashboard Settings > General
include (get_template_directory().'/includes/admin.php');

// Add theme support for the title tag - generate and output the title tag
add_theme_support('title-tag');

// Add theme support for Page Excerpts - creates an excerpt field for manual entry
add_post_type_support('page','excerpt');

// Add theme support for post and page thumbnails - featured images
add_theme_support('post-thumbnails');

// Adds new featured image sizes by pixels - horizontal px, vertical px
add_image_size('small-entry-image',180,120,true);
add_image_size('medium-entry-image',360,240,true);
add_image_size('large-entry-image',900,600,true);
set_post_thumbnail_size(180,120);

// Removes [...] in post excerpt - adds a filter on `excerpt_more` that returns an empty string.
add_filter('excerpt_more','__return_empty_string');

// Increase Admin Bar width to 400px for the WordPress Customizer
add_action('customize_controls_print_styles','my_customizer_styles',999);  // Activate the following function
function my_customizer_styles() { ?>
	<style>
		.wp-full-overlay-sidebar{min-width:400px!important;} /* Width of Customizer = 400px */
		.wp-full-overlay.expanded{margin-left:400px!important;} /* Set left margin to accommodate */
		.description.customize-section-description{display:none;} /* Hide labels to make more vert space */
	</style><?php
}
Walk through each WordPress function and PHP expression in your functions.php file:
- PHP expression
include()is a PHP expression that includes and evaluates a specified file - WP function
get_template_directory_uri()retrieves your theme template directory URI - WP function
add_theme_support()registers theme support for a given feature - WP function
add_post_type_support()registers support of certain post type features - WP function a
dd_image_size()registers a new image size used by your theme - WP function
set_post_thumbnail_size()registers a post thumbnail image size - WP function
add_filter()adds a callback function to a filter hook in WordPress - WP function
add_action()adds a function to an action hook in WordPress
SIDE NOTE: The my_customizer_styles() function increases the customizer from 300 to 400 pixels wide for better usability. Appearance > Customize > Admin Sidebar > Additional CSS is great for live formatting. Once you’re happy with the results, cut and paste that CSS into your theme files. Also, publish your CSS in the sidebar when needed.
This completes your functions.php file. Later, you may add, remove, or change some functions as you learn how to make a WordPress theme on your own.
How to make a WordPress theme with theme divs and surrounding code
Every theme div you add is complete and self contained, similar to a plugin, but without overhead. As such, each will include CSS within <style> tags – the <style></style> element. Surrounding code is simply required or optional code that frames your theme divs, defines functionality, or declares data.
You will add theme divs to different theme files depending on where they show up on your website. Regarding your theme PHP files you’ve already created, the majority of the them will be declared as HTML files. As such, most theme files will contain the <!DOCTYPE HTML> tag at the top.
As you add HTML content to your theme files, you’ll notice that they contain PHP within the HTML. WordPress PHP functions are used to place data within the HTML to be rendered in the browser. To explain, these functions pull data from the database so you don’t have to write additional PHP code.
After all theme divs are pasted in and modified to meet your needs, the CSS from each theme div is cut and pasted into appropriate CSS files for better performance and organization. There are two advantages to doing it this way:
- Each theme div is plug-and-play and self-contained – they work once pasted in
- Learning and practice you receive throughout the entire process
Let’s begin…
header.php content – the top of your website
Your header.php file is essential for any WordPress theme. This is where your <head> declarations go along with your menu, social icons, and other items placed at the top of almost every web page. With few exceptions like some types of landing pages, all your page files call the header first.
The content of your header.php file contains the opening <html> tag, the entire <head></head> element, the opening <body> tag. Then in this example, it contains three theme divs. To explain, your <head></head> element declares the metadata – the important things about your website. Also, this is where you’ll paste codes from Google and other sources in the future.
At the top of your WordPress header.php file, paste in the following:
<!DOCTYPE HTML> <!-- HEADER -->

<?php $info = $args; /* Array passed by page file put into $info array for common naming */ ?>

<html lang="en-US"> <!-- <html> is opened here and closed in footer.php - contains entire website -->
The <html> opening tag is without a closing tag in header.php. The </html> closing tag is located at the bottom of the footer since it contains the following <head> metadate element and your entire website within it.
Insert the HEAD metadata element
Next, the <head> section declares your website metadata: website title, character set and viewport sizing, tagline, keywords, and URL share content for social-media sharing. In the future, you’ll paste various codes into your <head> section from Google and other services that you use with your website.
Social-media sharing declarations provide visual impact when sharing your link. To explain, when you enter your website URL into a social media platform like Facebook or Linkedin, a thumbnail, title, tagline, and the URL itself will automatically load and display. Sometimes it takes a few seconds to load.
Your URL sharing thumbnail is named share-thumbnail-900×600.jpg. Created and save this image in your theme’s /images folder. As an example, a website screenshot of 900px x 600px works great.
Paste the following <head></head> element that contains everything described above:
<head>
	<title><?php echo $info['name']; ?></title> <!-- Pulls title you set in WorPress -->
	<meta charset="UTF-8" name="viewport" content="width=device-width, initial-scale=1"> <!-- 'width-device-width' keeps viewport within device horizontal boundaries -->
	<meta name="description" content="<?php echo $info['desc']; ?>" /> <!-- Pulls description (tagline) you set in WorPress -->
	<meta name="keywords" content="<?php echo $info['name']; ?>" /> <!-- Sets title as primary keyword -->
	<meta property="og:title" content="<?php echo $info['name']; ?>" /> <!-- Causes title to show up when sharing URL online -->
	<meta property="og:image" content="<?php echo $info['uri'].'/images/share-thumbnail-900x600.jpg'; ?>" /> <!-- Causes thumbnail to show up when sharing URL online -->
	<meta property="og:description" content="<?php echo $info['desc']; ?>" /> <!-- Causes description (tagline) to show up when sharing URL online -->
	<meta property="og:url" content="https://yourwebsite.com" /> <!-- Causes URL to show up when sharing URL online -->
	<meta property="og:image:width" content="900" /> <!-- Sets share thumbnail width -->
	<meta property="og:image:height" content="600" /> <!-- Sets share thumbnail height -->
	<meta property="og:type" content="website" /> <!-- Sets share content to "website" -->
	<?php wp_head(); ?> <!-- Sends the scripts and data within this head element to the front end -->
</head>
The <head> element is a container for the following elements: <title>, <style>, <meta>, <link>, <script>, and <base>. HTML metadata is data about the HTML document. It is not displayed.
BODY tag starts your BODY element
Your <body> element contains or wraps all of your website content. From the header content and main page content to the footer content, every section goes into the <body> element. Then, your <body> element is closed with the </body> closing tag at the end of your footer.php file below all website content.
Paste the following <body> tag below your <head></head> metadata element:
<body> <!-- <body> is opened here and closed in footer.php - contains all website content -->
HEADER theme div contains nested theme divs
Next, the <header> element is a theme div that will contain your TOP BAR and MENU WITH LOGO theme divs nested inside it once you paste them in place. Note that the <header> element ends with its own CSS within the <style> element before the closing tag. That is what makes your header a self-contained theme div.
Paste in the following <header> theme div below your <body> tag:
<header> <!-- Contains nested TOP BAR and MENU WITH LOGO theme divs -->
	<article> <!-- Wraps entire header for CSS positioning purposes -->

	<!–- Nested header theme divs go here -–>

	</article>
	<style>
		header {
			position:sticky;
			top:0;
			width:100%;
			z-index:9;
		}
		header article {
			position:absolute;
			width:100%;
			top:0;
		}
		header article li {
			list-style-type:none!important;
			text-decoration:none!important;
		}
	</style>
</header>

<!-- REMINDER: </html> and </body> closing tags are located in the footer at the end - CSS for both is located there -->
Now, let’s add some two theme divs that go into your HEADER theme div…
How to make a WordPress theme with a TOP BAR theme div
The following TOP BAR theme div renders a bar that sticks to the very top of your website above your menu. This bar contains social icons and your tagline on the left and your contact info on the right.
Paste the following TOP BAR theme div in place of the <!– Nested header theme divs go here –> comment or below it if you want to keep the comment there for reference:
<section class="top-bar"> <!-- Self-contained TOP BAR theme div - like a plugin -->
<nav class="social-icons-wrap">
<ul class="social-icons"> <!-- URLs are pulled from WordPress Dashboard Settings > General as defined in admin.php -->
<li><a href="<?php echo 'https://'.$info['fb-url']; ?>"><i class="fa fa-facebook"></i></a></li>
<li><a href="<?php echo 'https://'.$info['tw-url']; ?>"><i class="fa fa-twitter"></i></a></li>
<li><a href="<?php echo 'https://'.$info['yt-url']; ?>"><i class="fa fa-youtube"></i></a></li>
<li><a href="<?php echo 'https://'.$info['li-url']; ?>"><i class="fa fa-linkedin"></i></a></li>
</ul>
</nav>
<p id="tagline"><?php echo $info['desc']; ?></p>
<span class="top-cont-info"> <!-- Email and phone# pulled from WordPress Dashboard Settings > General as defined in admin.php -->
<a href="mailto:<?php echo $info['email']; ?>">
<i class="fa fa-envelope"></i>
<span class="top-cont-email"> <?php echo $info['email']; ?></span>
</a>
<a href="tel:<?php echo $info['phn']; ?>">
<i class="fa fa-phone"></i>
<span class="top-cont-phone font-top-cont-info"><?php echo $info['phn']; ?></span>
</a>
</span>
<style>
.top-bar {
position:relative;
display:inline-block;
background:black;
width:100%;height:38px;
margin-bottom:-4px;
transition:.2s ease;
}
.top-bar a {color:lightblue;}
.top-bar a:hover {color:lightgray;}
.top-bar .social-icons-wrap {
display:inline-block;
width:auto;
float:left;
}
.top-bar .social-icons {
display:flex;
justify-content:space-evenly;
width:100%;
padding:1px 8px;margin:0;
}
.top-bar .social-icons a {
display:block;
background:#444;
padding:2px 4px;margin:4px;
font-size:22px;
text-align:center;
min-width:26px;
border-radius:5px;
}
.top-bar .social-icons a:hover {background:gray;}
#tagline {;
position:relative;
display:inline-block;
margin:10px 0 0;
font-weight:600;
float:left;
color:white;
}
.top-cont-info {margin:10px 8px 0;;float:right;}
@media (max-width: 899px) {.top-cont-info span {display:none;}} /* Removes phone# and email for mobile - leaves icons in place */
@media (max-width: 599px) {#tagline {display:none;}} /* Removes tagline in mobile */
</style>
</section>
Notice how individual pieces of data are used in this theme div from your $info array, such as $info['fb-url']. This specific variable selects fb-url, which is the Facebook URL you enter into your WordPress Dashboard panel > Settings > General. Once you’ve added admin.php content later in this tutorial, your social media URL fields will appear on that Dashboard page.
How to make a WordPress theme with a MENU WITH LOGO theme div
Below the top bar sits your menu centered horizontally with your logo on the left. This menu sticks to the top for accessibility after scrolling down. In other words, everything below the menu passes right under it as you scroll down.
Paste this MENU WITH LOGO theme div right below the TOP BAR theme div:
<section class="header-menu-logo"> <!-- Self-contained MENU WITH LOGO theme div - like a plugin -->
	<a href="<?php echo $info['url']; ?>" class="logo-wrap">
		<img src="<?php echo $info['uri'] . '/images/logo.png'; ?>" class="logo" alt="<?php echo $info['name']; ?>">
	</a-->
	<nav class="header-menu">
		<ul class="hdr-menu-ul">
			<li class="menu-item home">
				<a href="<?php echo $info['url']; ?>" class="menu-item-a home"> <!-- Home URL represented by home icon and given overline if on home page -->
					<i class="home-icon fa fa-home" <?php if (is_front_page()) echo 'style="border-top:solid 2px"'; ?>></i>
				</a>
			</li>
			<li class="menu-item">
				<a href="<?php echo $info['url'].'/services/'; ?>" <?php if (is_page('services')) echo 'class="current-menu-item-a menu-item-a"'; else echo 'class="menu-item-a"'; ?>>Services</a> <!-- Links to page with "services" slug -->
			</li>
			<li class="menu-item">
				<a href="<?php echo $info['url'].'/blog/'; ?>" <?php if ((is_single() || is_home())) echo 'class="current-menu-item-a menu-item-a"'; else echo 'class="menu-item-a"'; ?>>Blog</a> <!-- Links to page with "services" slug -->
			</li>
			<li class="menu-item">
				<a href="<?php echo $info['url'].'/about/'; ?>" <?php if (is_page('about')) echo 'class="current-menu-item-a menu-item-a"'; else echo 'class="menu-item-a"'; ?>>About</a> <!-- Links to page with "about" slug -->
			</li>
			<li class="menu-item">
				<a href="#contact" class="menu-item-a">Contact</a> <!-- Jumps down to the contact section in the footer -->
			</li-->
		</ul>
	</nav>
	 <style>
		.logo-wrap {position:absolute;z-index:2;} /* Position the logo over the menu bar and in front */
		.logo {height:34px;margin:4px;} /* Width varies depending on image aspect ratio */
		.home-icon {border-color:blue;}
		.header-menu {
			position:absolute;
			display:block;
			width:100%;
			background:darkgray;
		}
		.hdr-menu-ul {
			display:flex;
			justify-content:center;
			margin:0;padding:0;
		}
		.menu-item {margin:10px;}
		.menu-item-a {color:white;font-size:20px;}
		.menu-item-a:hover,.menu-item-a:focus,.current-menu-item-a {text-decoration:overline;}
		.menu-item.home {margin-bottom:9px;} <!-- Adjustment for the house icon to accommodate overline using border -->
		.menu-item-a.home:hover > .home-icon,menu-item-a.home:focus > .home-icon,current-menu-item-a.home > .home-icon {border-top:solid 2px;}
		@media (max-width: 599px) { /* Reduce and raise logo and reduce menu margin and font size in mobile */
			.logo-wrap {margin-top:-35px;margin-left:55%;}
			.logo {height:22px;margin-top:8px;}
			.menu-item {margin:10px 4px;}
			.menu-item-a{font-size:16px;}
		}
	 </style>
</section>
In HTML, an <img> tag is required to contain alt="" within them. As such, your logo <img> tag contains: alt="<?php echo $info['name']; ?>", which puts the name of your website from your WordPress Dashboard panel Settings > General. If you want to add more info, simply put a comma after the closing PHP tag ?> and add additional info like this: alt="<?php echo $info['name']; ?>, additional info".
Inside the first list item <li> element, notice the PHP: <?php if (is_front_page()) echo 'style="border-top:solid 2px"'; ?>>. This code puts a line over the house icon using style="border-top:solid 2px" if the current page is_front_page(). This is a WordPress function that represents your homepage. It returns TRUE or FALSE, TRUE meaning you’re currently on your homepage.
Within the second list item, check out the PHP: <?php if (is_page('services')) echo 'class="current-menu-item-a menu-item-a"'; else echo 'class="menu-item-a"'; ?>. This code checks if you’re on the Services page using the is_page() WordPress function. If on Services page, current-menu-item-a class is added. This class adds text-decoration:overline; CSS from the <style> element when you’re on that page.
front-page.php starting content – homepage
Now that you’ve pasted all content within your header.php file, save it and open your empty front-page.php file. As you can see, by pasting each theme div individually, you’re getting a high-level feel for how the code joins together.
Your front-page.php file is one of a few page PHP files that go between your header and footer, depending on the page visited. Specifically, your front-page.php file renders your homepage. This PHP page file is automatically used by WordPress when yourwebsite.com is opened.
After your homepage or any other page is opened, it uses two WordPress functions, one that loads your header and one that loads your footer. Also, these functions contain the $info array within the parentheses. As such, both functions pass $info to your header and footer respectively.
How to make a WordPress theme that avoids repeat database accesses to load fast
The $info array containing all information used by your website from your WordPress Dashboard panel is passed to your header and footer to avoid repeat database accesses. This practice keeps your website fast since each database access takes time – do it once and hold the data in an array.
In addition to front-page.php, there are other types of pages, blog posts, and custom post types. Each of these load the header and footer with a few exceptions. For now, all page PHP files presented here will load the header and footer and pass the $info array to them.
As you’ll see, the following content contains one section filled with Lorem Ipsum text to fill the page so you can scroll down. Delete and replace this temporary fill-section later. Also, theme divs for inner website sections are added later. Those are rows of content, like sliders, forms or headings with text.
Copy and paste the following content into your front-page.php file:
<!DOCTYPE HTML> <!-- FRONT PAGE -->

<?php /* Gather all data from the WordPress Dashboard Settings > General stored in the database */
$info = array(
	'name'		=> get_bloginfo('name'),
	'desc'		=> get_bloginfo('description'),
	'uri'		=> get_template_directory_uri(),
	'url'		=> site_url(),
	'email'		=> get_option('email'),
	'phn'		=> get_option('phone'),
	'street'	=> get_option('street'),
	'city'		=> get_option('city'),
	'state'		=> get_option('state'),
	'zip'		=> get_option('zip'),
	'yt-url'	=> get_option('youtube_url'),
	'fb-url'	=> get_option('facebook_url'),
	'tw-url'	=> get_option('twitter_url'),
	'li-url'	=> get_option('linkedin_url'),
	'ig-url'	=> get_option('instagram_url')
);

get_header('', $info); ?>

<!– Nested front-page theme divs go here –>

<!– Delete the following fill section once theme divs are pasted in –>
<section style="width:100%;color:white;padding-top:140px;"><article style="width:700px;margin:0 auto;"><p>Lorem ipsum dolor sit amet. Sed voluptatem dicta et reprehenderit quia a consequuntur praesentium sed quasi praesentium rem eveniet ducimus. Vel possimus consequatur ut eveniet obcaecati id rerum repellendus eum nostrum voluptatem est optio culpa est dolorem dolorem est voluptas aliquam. Et exercitationem omnis ex explicabo officia aut eius molestias. </p><p>Ea adipisci molestiae cum quos quod sed modi velit. Sed odit molestiae aut magnam magnam et perspiciatis galisum vel necessitatibus veniam sit quas quia non quaerat voluptatem. Et impedit laboriosam et veritatis nisi aut facilis nostrum ut voluptas alias qui modi corrupti et laudantium sunt. Qui deleniti eveniet est aspernatur explicabo et explicabo voluptatem et deleniti esse cum autem consequuntur. </p><p>Qui unde odio qui vitae laudantium hic quas veritatis id recusandae nemo. Quo reiciendis nostrum et voluptatem minus et odit minima qui cupiditate doloremque qui veniam saepe et itaque laudantium et dolorum omnis. </p><p>Et temporibus architecto est eligendi commodi et voluptas nobis eos harum quae. Sit ducimus enim quo nihil corporis id dolores excepturi ut provident aliquid qui enim facilis. Cum quia dolorum et exercitationem consequatur qui ullam error aut dolore quibusdam aut sint laudantium. Ut eius eveniet id deleniti magni ut illo sint. </p><p>Est ducimus veniam quo galisum recusandae qui reiciendis atque ut ipsam aperiam est corporis dolore et consequatur ratione et doloremque velit. Et sint odit et atque sapiente rem temporibus quibusdam cum dolores officia non consequatur enim. Non exercitationem consectetur eos unde velit aut dolor incidunt eum officia impedit sed sunt fugit eos temporibus consequatur. Non molestias fugiat a atque dolorem aut sapiente doloremque et Quis accusamus est sint galisum. </p><p>Non harum dignissimos qui veritatis repudiandae vel necessitatibus exercitationem ut quaerat perferendis sed pariatur nihil? At quaerat molestiae sed quis esse et consequatur necessitatibus a quam unde non repellat culpa. Nam debitis laborum ex libero omnis ea numquam quod et saepe dolor et impedit adipisci sit voluptatibus cupiditate aut doloribus galisum. Eos voluptate modi aut numquam rerum sit eligendi distinctio. </p><p>Qui quae obcaecati quo repudiandae unde aut omnis labore ea animi officia rem temporibus quis sed nisi internos! Ut numquam magnam vel possimus sunt non optio saepe. Aut velit dignissimos et iusto iusto id facere repellat. </p><p>Aut sunt inventore et quia suscipit vel quia suscipit sit labore animi et cupiditate repellendus? Qui nemo esse est dicta consequatur est eveniet tempore. Id veniam accusantium aut dolorum perferendis rem eaque quod. Aut distinctio sequi non perspiciatis sunt aut sint quis 33 delectus placeat. </p><p>Ab architecto quia est inventore deleniti ex nesciunt nihil. Aut quasi possimus qui architecto officia sed facilis autem. Id nihil obcaecati sit rerum ullam est debitis cumque et quia tempore sed facere iusto a quibusdam iure. Est voluptatum assumenda quo provident culpa a tenetur autem eum iste molestiae. </p><p>Qui asperiores error est magni neque ut porro delectus non aspernatur reprehenderit quo praesentium quaerat qui eaque quidem. Est debitis accusantium qui tempora rerum eos dolore repellat ut sapiente repellat At tenetur ullam et maiores dolores. </p><p>Est voluptate galisum ut quaerat minus est tempora fugit et velit porro et libero ipsam. Sit laborum molestiae id voluptates consequuntur non rerum omnis ut consequuntur quaerat aut expedita sint. Ut distinctio culpa et tenetur quisquam qui tempora quia ea reiciendis nihil? Est nobis fugiat vel dolor tenetur aut laboriosam molestiae est praesentium dicta non quia quia. </p><p>Id illum vero sed internos tenetur est laboriosam galisum. Eos voluptas accusantium qui tempore dicta aut adipisci obcaecati. Qui quibusdam amet quo placeat animi in quibusdam sint sed voluptatem unde est mollitia veritatis id voluptatem dolor! Eos Quis suscipit et aliquid perferendis aut enim obcaecati et dolor facilis vel minima nemo ut officiis magni qui perferendis doloribus? </p><p>Et eligendi vitae id officia minima est galisum itaque eos molestiae harum in beatae error et dignissimos libero et dolor voluptas. Aut accusantium voluptas et laudantium dicta qui illum cupiditate est ipsum nisi. Ad exercitationem unde qui voluptatem sequi et impedit ratione in magni cumque sit quibusdam rerum qui eligendi eligendi ut vero nesciunt. Est voluptas provident est galisum laudantium cum eveniet molestiae sed alias maxime sed culpa similique. </p><p>Eum esse iure non cupiditate illum in alias facilis et natus minima et distinctio aliquid. Sed iste voluptatem sit amet corporis et accusamus quas et excepturi totam qui dolores omnis. Aut reiciendis repellat est enim rerum et praesentium quas vel maxime laudantium eos illo vitae quo alias quia. In saepe alias ut sapiente officia et sequi quis est voluptatem eaque. </p><p>Sed assumenda quasi eos nihil quia et numquam reiciendis ea voluptatem quisquam et accusantium distinctio est perferendis quia! Quo impedit blanditiis a aperiam voluptate ab unde labore est rerum ipsam et maxime explicabo qui impedit magni. </p><p>Sed voluptatem omnis ut praesentium reiciendis quo quae quidem At numquam internos in optio cupiditate et galisum reprehenderit. Eum fugiat quas ut laborum impedit et soluta amet cum fuga consequatur est accusantium quam et blanditiis laborum. </p><p>Qui error dolorum id assumenda molestiae ex earum adipisci est enim repellat et assumenda neque aut velit sint et esse numquam. Ea obcaecati incidunt et saepe beatae et suscipit voluptatum et velit possimus. </p><p>A incidunt tempora hic sint reiciendis non quia similique hic maxime accusantium. Ad tempore dolor ut rerum accusamus qui natus possimus eum libero quasi. Vel officiis molestiae qui autem inventore aut officia adipisci vel atque rerum ea consectetur nulla vel facere blanditiis eum asperiores dolores. </p><p>Qui inventore corrupti et quas obcaecati et iure laudantium? Est deleniti pariatur in distinctio animi in fuga sunt et error ipsum est corporis voluptatem est dolores voluptates et ratione sint. </p><p>Non eveniet mollitia ut labore quia et amet numquam ut aspernatur dolor eum nulla necessitatibus et illum voluptatem. Aut dolores molestias et quas beatae cum quisquam facere eum molestiae dolores aut officia voluptatem ut nisi quam vel dolor quaerat. Aut quod similique vel odio iste qui dolores minima et perspiciatis omnis qui nihil laboriosam est autem reprehenderit qui eaque perspiciatis. A dolorem earum qui debitis nesciunt ab asperiores quam vel amet quis ut nihil odio. </p></article>
</section>

<?php get_footer('', $info); ?>
Walk through each WordPress function in your front-page.php file:
get_bloginfo()retrieves site info from the databaseget_template_directory_uri()retrieves your theme template directory URIsite_url()retrieves the URL for the current siteget_option()gets an option value based on its name in the databaseget_header()loads header.php and allows data to be passedget_footer()loads footer.php also allowing data to be passed
Your theme divs will go between the get_header() and get_footer() functions, replacing the temporary section filled with Lorem Ipsum text – the Lorem Ipsum text gives your page life while being developed.
front-page.php content explained
At the top, notice the $info array definition. It pulls in each piece of data from the WordPress Dashboard panel Settings > General. For convenience, admin.php adds additional fields in the WordPress Dashboard, which already contains your Site Title and Tagline fields.
To explain one example, $info[‘name’] contains the website title as retrieved by the WordPress function get_bloginfo(‘name’). The word ‘name’ is the key that contains your site title that is entered into the Dashboard panel Settings > General and saved in the database.
To further explain how a PHP array is assembled, the array variable $info is filled with elements called key => value pairs within the array() PHP construct. It takes any number of comma-separated key => value pairs as arguments. See the structure below:
array(

key  => value,

key2 => value2,

key3 => value3,

...Add as many 'key => value' pairs as you wish

)
footer.php content – bottom of your website
Next, your footer.php file contains three sections: a contact-form theme div, a three-column footer theme div and a branding bar theme div at the very bottom. You’ll paste in these theme divs the same way you did in your header.php file, either in place of the <!– Nested footer theme divs go here –> or below it.
Now, paste the following surrounding code into your WordPress footer.php file:
<!DOCTYPE HTML> <!-- FOOTER -->

<?php $info = $args /* Place the array passed by page file into $info array to keep common variable name */ ?>

<!– Nested footer theme divs go here –>

<?php wp_footer(); ?> <!-- Fires the wp_footer action that prints scripts or data before the closing body tag on the front end -->

	<!-- CSS for the <body></body> element opened in header.php -->
	<style>
		body {
			position:relative;
			margin:0;
			font-family:'Montserrat',sans-serif;
			font-size:16px;
			font-weight:400;
			color:#222;
			overflow-x:hidden;
			background:#444;
		}
		a { /* Links */
			display:inline-block;
			text-decoration:none;
			font-weight:600;
			color:blue;
		}
		a:focus,a:hover {color:gray;}
		/* Headings */
		h1 {font-size:60px;font-weight:800;}
		h2 {font-size:36px;font-weight:600;}
		h3 {font-size:28px;font-weight:600;}
		h4 {font-size:22px;font-weight:600;}
	</style>
</body>

	<!-- CSS for the <html></html> element opened in header.php -->
	<style>
		html {
			box-sizing: border-box;
			-moz-osx-font-smoothing:grayscale;
			-webkit-font-smoothing:antialiased;
			margin-top:0!important; /* Removes margin added by WordPress when logged in */
		}
		*, *::before,*::after {box-sizing:inherit;}
		#wpadminbar { /* Keep WordPress admin bar invisible unless hovering */
			position:absolute; /* Set to "absolute" hides it when scrolling down. Change to "Fixed" to remain when scrolling down */
			top:0;
			opacity:0;
			transition:.2s ease;
		}
		#wpadminbar:hover {opacity:1;transition:.2s ease;} /* Reveals WordPress admin bar when hovering */
	</style>
</html>
The wp_footer() WordPress function fires an action that prints scripts or data before the closing </body> tag on the front end. Then below that, the closing tags for the <body> element and <html> element are in place with their corresponding CSS within the <style> element placed right before those closing tags.
SIDE NOTE: Admin Customizer Top Bar adjustments were made to separate it from the site. As a pop-down, it doesn’t push the website down causing CSS confusion. The positioning is set to absolute so it isn’t there when scrolling down. Set it to fixed if you want it to remain there when scrolling down.
Paste your CONTACT FORM theme div into footer.php
In this theme, place your CONTACT FORM theme div at the top of footer.php. That way, it will always be there regardless of what page or post you open in your website. Although you can create a contact page in the future that links from your menu, using this contact form from your menu works quite well.
This contact form theme div is preceded by a <div id="contact"></div> element containing the id value of contact. This <div> provides a spacer above the contact-form pushing it below the header menu to make it visible. When you click on menu item Contact, it scrolls down to the contact form on every page or post, which is the advantage to being inside the footer.
Paste the following CONTACT FORM theme div in place of or below the <!–- Nested footer theme divs go here -–> comment:
<div id="contact"></div> <!-- Spacer to push the actual contact section below the menu -->
<section class="footer-contact">
<div class="contact-heading">
<h2>CONTACT ME BELOW</h2>
<h3>I'll be happy to answer your questions!</h3>
</div>
<form action="/contact.php" method="post">
<div class="two-cols">
<div class="col">
<label class="" for="fn"> Your first name</label><br><input id="fn" name="fn" required="" autocomplete="fn">
</div>
<div class="col">
<label class="" for="ln"> Your last name</label><br><input id="ln" name="ln" autocomplete="ln">
</div>
</div>
<div class="two-cols">
<div class="col">
<label class="" for="eml"> Your email</label><br><input id="eml" name="eml" required="" autocomplete="eml">
</div>
<div class="col">
<label class="" for="pn"> Your phone #</label><br><input id="pn" name="pn" required="" autocomplete="pn">
</div>
</div>
<div class="form-row">
<label for="mssg">Questions? Inquire here:</label><br>
<textarea id="mssg" name="mssg" autocomplete="mssg"></textarea><br>
</div>
<input type="hidden" id="url" name="url" value="<?php global $wp;$url = home_url( add_query_arg( array(), $wp->request )); echo $url; ?>">
<div class="form-row">
<input type="submit" id="submit" value="SUBMIT INQUIRY" >
</div>
<br><br>
</form>
<style>
#contact {padding:30px;background:#292929;} /* Background is slightly darker than the section for a border effect */
.footer-contact {
display:block;
background:#333;
width:100%;
padding-bottom:40px;
overflow:hidden;
color:white;
}
.footer-contact .contact-heading {
width:100%;
padding:40px;
display:flex;flex-wrap:wrap;
justify-content:center;align-items:center;
text-align:center;
overflow:hidden;
}
.footer-contact h2 {width:100%;}
.footer-contact h3 {width:100%;}
.footer-contact form {font-weight:600;padding-top:10px;}
.footer-contact .two-cols {
display:flex;flex-wrap:wrap;
justify-content:space-between;
max-width:470px;width:auto;
margin:10px auto;
}
.footer-contact .col {
position:relative;
display:block;
margin:auto;
}
.footer-contact .form-row {
max-width:470px;width:auto;
margin:0px auto;padding:0 8px;
}
.footer-contact input,.footer-contact textarea {border-radius:10px;}
.footer-contact .form-row input {max-width:455px;width:100%;border-radius:10px;}
.footer-contact input,.footer-contact textarea {
padding:10px;
border:1px solid #ccc;
border-radius:10px;
color:black;
}
.footer-contact textarea {width:100%;height:80px;}
#submit {
font-weight:600;
color:black!important;
margin-top:10px;
background:lightblue;
}
#submit:hover {background:lightgray;cursor:pointer;}
</style>
</section>
Near the top, the HTML element <form action=”/contact.php” method=”post”> contains the fields within the form. The action points to your contact.php file that provides your form-submission functionality. Then, the method uses post to hide the data that it passes after the submit button is pressed.
Paste your THREE-COLUMN FOOTER theme div
Below the contact form is your THREE-COLUMN FOOTER theme div. There are many types of footer layouts – this one is a three-column layout. In this layout, your address and contact info goes on the left, your logo goes in the middle, and your menu sits on the right.
Paste the following THREE-COLUMN FOOTER theme div below the CONTACT FORM theme div in your footer.php file:
<section class="three-col-footer">
<div class="footer-col footer-1">
<h2><?php echo $info['name']; ?></h2>
<p><?php echo $info['street'].'<br>'.$info['city'].', '.$info['state'].'  '.$info['zip']; ?></p>
<h2>CONTACT</h2>
<nav class="social-icons-wrap"> <!-- CSS from header social icons applies to these too -->
<ul class="social-icons">
<li><a href="<?php echo 'https://'.$info['fb-url']; ?>"><i class="fa fa-facebook"></i></a></li>
<li><a href="<?php echo 'https://'.$info['tw-url']; ?>"><i class="fa fa-twitter"></i></a></li>
<li><a href="<?php echo 'https://'.$info['yt-url']; ?>"><i class="fa fa-youtube"></i></a></li>
<li><a href="<?php echo 'https://'.$info['li-url']; ?>"><i class="fa fa-linkedin"></i></a></li>
<li><a href="<?php echo 'https://'.$info['ig-url']; ?>"><i class="fa fa-instagram"></i></a></li>
</ul>
</nav>
<p><a href="mailto:<?php echo $info['email']; ?>" class="footer-cont"><i class="fa fa-envelope"></i>  <?php echo $info['email']; ?></a></p>
<p><a href="tel:<?php echo $info['phn']; ?>" class="footer-cont"><i class="fa fa-phone"></i> <?php echo $info['phn']; ?></a></p>
</div>
<div class="footer-col footer-2 float-on-scroll fade-in">
<a href="<?php echo $info['url']; ?>">
<img src="<?php echo $info['uri'].'/images/logo.png'; ?>" alt="<?php echo $info['name']; ?>">
</a>
</div>
<div class="footer-col footer-3">
<h2>NAVIGATION</h2>
<nav class="footer-menu">
<ul>
<li class="menu-item home">
<a href="<?php echo $info['url']; ?>" class="menu-item-a home"> <!-- Home URL represented by home icon and given overline if on home page -->
<i class="home-icon fa fa-home" <?php if (is_front_page()) echo 'style="border-top:solid 2px"'; ?>></i>
</a>
</li>
<li class="menu-item">
<a href="<?php echo $info['url'].'/services/'; ?>" <?php if (is_page('services')) echo 'class="current-menu-item-a menu-item-a"'; else echo 'class="menu-item-a"'; ?>>Services</a> <!-- Links to page with "services" slug -->
</li>
<li class="menu-item">
<a href="<?php echo $info['url'].'/blog/'; ?>" <?php if ((is_single() || is_home())) echo 'class="current-menu-item-a menu-item-a"'; else echo 'class="menu-item-a"'; ?>>Blog</a> <!-- Links to page with "services" slug -->
</li>
<li class="menu-item">
<a href="<?php echo $info['url'].'/about/'; ?>" <?php if (is_page('about')) echo 'class="current-menu-item-a menu-item-a"'; else echo 'class="menu-item-a"'; ?>>About</a> <!-- Links to page with "about" slug -->
</li>
<li class="menu-item">
<a href="#contact" class="menu-item-a">Contact</a> <!-- Jumps down to the contact section in the footer -->
</li-->
</ul>
</nav>
</div>
<style>
.three-col-footer {
position:relative;
display:flex;flex-wrap:wrap;
justify-content:space-between;
background:#111;
padding:20px;
color:white;
}
a.footer-cont {color:lightblue;}
a.footer-cont:hover {color:lightgray;}
.footer-col {
min-width:360px;width:33%;
padding:20px;
}
.three-col-footer ul {
list-style-type:none;
text-decoration:none;
color:white;
}
.footer-col h2 {font-size:28px;margin:10px 0 0;}
.footer-1 {display:block;position:relative;}
.footer-1 h2 {width:100%;text-align:left;}
.footer-1 p {margin:0;line-height:1.4;}
.footer-1 .social-icons-wrap {
display:block;
position:relative;
width:100%;
}
.footer-1 .social-icons {
display:flex;
justify-content:left;
padding:0;margin: 0 0 10px;
}
.footer-1 .social-icons a {
display:block;
background:#444;
padding:2px 4px;margin:4px;
font-size:22px;
text-align:center;
min-width:26px;
border-radius:5px;
color:lightblue;
}
.footer-1 .social-icons a:hover {color:lightgray;background:gray;}
.footer-2 {
position:relative;
display:flex;
justify-content:center;align-items:center;
}
.footer-2 div {
display:flex;flex-wrap:wrap;
position:relative;
justify-content:center;align-items:center;
}
.footer-3 {text-align:right;}
.footer-3 ul {padding:0;}
.footer-3 li {margin-bottom:10px;}
.footer-3 a {color:lightblue;}
.footer-3 a:hover {color:lightgray;}
</style>
</section>
Notice how this THREE-COLUMN FOOTER theme div provides social-media icons with links and your menu using the same functionality as your header. Since data is passed from your page PHP file, the $info array provides the information to avoid additional database accesses.
How to make a WordPress theme with a bottom BRANDING BAR
Finally, your BRANDING BAR theme div goes at the very bottom. This bar shows the copyright, site title, and your brand info as the website developer. You get a good backlink from this branding bar theme div.
Paste the following BRANDING BAR theme div below the three-column footer section:
<section class="below-footer">
<p>Copyright © <script>document.write(new Date().getFullYear());</script> · <?php echo $info['name']; ?> · By: <a href="https://hixonic.com/" title="What you do"> Your Name </a>of <a href="https://hixonic.com/" title="What you do"><img src="https://dev.hixonic.com/wp-content/themes/theme-starting-content/images/logo.png" alt="Your alt text" width="70"></a></p> <!-- width based on image aspect ratio -->
<style>
.below-footer {
position:relative;
background:black;
margin-bottom:-16px;padding:5px 20px 10px;
color:white;}
.below-footer p {margin:0;text-align:center;}
.below-footer a {color:lightblue;}
.below-footer img {margin-top:5px;margin-bottom:-5px;}
</style>
</section>
The <script>document.write(new Date().getFullYear());</script> element adds a script showing the current year. As such, it will automatically update to the next year on Jan. 1st of each year.
That completes your footer.php file. Your website homepage is now complete from top to bottom. Only one item remains: your contact.php file you created in your domain root directory. That file gives your contact form submit functionality – form data is emailed to you.
Contact form submit functionality – contact.php
Paste the following PHP code into your empty contact.php file located in the root directory of your domain:
<?php // CONTACT.PHP - Provides submit functionality to the contact form

if (isset($_POST["eml"])) {
    $fname=$_POST["fn"];
    $lname=$_POST["ln"];
    $email=$_POST["eml"];
    $phone=$_POST["pn"];
    $mssg=$_POST["mssg"];
    $url=$_POST["url"];

    /* Send email containing form data */

    // the message
    $msg = "First name: ".$fname."\nLast name: ".$lname."\nEmail: ".$email."\nPhone number: ".$phone."\nMessage: ".$mssg."\nFromURL: ".$url;
    $header = "From: Site name";

    // use wordwrap() if lines are longer than 70 characters
    $msg = wordwrap($msg,70);

    // send email
    mail("you@yourwebsite.com","Site name: ".$fname." ".$lname,$msg,$header);

    /* Go back */

    header('Location: '.$url);
}
else {

	echo "Not Submitted!";

    exit();
}
Change the “From: Your website name” to your actual website name. Then, change “mail(“you@yourwebsite.com”,”Your website name:” in the same manor. Now, walk through each expression in your contact.php file:
- The
if (isset($_POST["eml"]))expression checks if contact.php was accessed by the contact form prior to code execution $fname=$_POST["fn"];loads FIRST NAME from the contact form data into the$fnamevariable$msgis filled with all email message content you receive after a contact-form submission$headercontains the content that will go into your email header$msg = wordwrap($msg,70);imposes thewordwrap()PHP function if there are 70 characters or moremail("you@yourwebsite.com","Site name: ".$fname." ".$lname,$msg,$header);sends an email withmail()PHP function
Now let’s do a little ground work in the WordPress Dashboard panel. You need to create a few pages that will load when selecting them from your menu.
Add your standard web pages in WordPress
Since your menu links to a Services page, a Blog page, and an About page, you’ll need to create those in WordPress so they function. Later, add your information to the Services and About pages. But for now, just add fill content to each. Your blog page has no content since it only lists your blog posts.
Remember: Once your theme is complete, zip it and move it to yourwebsite.com in WordPress. Then, remove your sub domain theme.yourwebsite.com, unless you plan to develop more themes there.
Create and fill your About and Services pages in WordPress
Start by creating a page with the title “About” so the slug is set to “about” allowing your menu to link to it correctly. Copy and paste your Lorem Ipsum text from your homepage to your About page for temporary fill content. Then, add a featured image for the same reason.
Your Services page comes next. Do the same with this page, using “Services” as the title and placing fill content. Use a different featured image for this page.
Make Home and Blog pages in WordPress
Next, create your blog page with the title “Blog” and create a home page with the title “Home.” Neither of these pages have content or featured images – they just need to exist. Next, see how your Home and Blog pages are selected in your WordPress Dashboard.
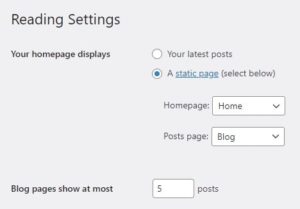
Set your Blog, Home page, & posts-per-page
The final step to setting up your standard web pages is to set your Blog and Home pages in the WordPress Dashboard: Settings > Reading.
Publish temporary blog posts for testing purposes
Right now, you should have one post called “Hello World.” Edit that post and paste the following Ipsum Lorem text below the sentence that already exist:
Lorem ipsum dolor sit amet. Sed voluptatem dicta et reprehenderit quia a consequuntur praesentium sed quasi praesentium rem eveniet ducimus. Vel possimus consequatur ut eveniet obcaecati id rerum repellendus eum nostrum voluptatem est optio culpa est dolorem dolorem est voluptas aliquam. Et exercitationem omnis ex explicabo officia aut eius molestias.

Ea adipisci molestiae cum quos quod sed modi velit. Sed odit molestiae aut magnam magnam et perspiciatis galisum vel necessitatibus veniam sit quas quia non quaerat voluptatem. Et impedit laboriosam et veritatis nisi aut facilis nostrum ut voluptas alias qui modi corrupti et laudantium sunt. Qui deleniti eveniet est aspernatur explicabo et explicabo voluptatem et deleniti esse cum autem consequuntur.

Qui unde odio qui vitae laudantium hic quas veritatis id recusandae nemo. Quo reiciendis nostrum et voluptatem minus et odit minima qui cupiditate doloremque qui veniam saepe et itaque laudantium et dolorum omnis.

Et temporibus architecto est eligendi commodi et voluptas nobis eos harum quae. Sit ducimus enim quo nihil corporis id dolores excepturi ut provident aliquid qui enim facilis. Cum quia dolorum et exercitationem consequatur qui ullam error aut dolore quibusdam aut sint laudantium. Ut eius eveniet id deleniti magni ut illo sint.

Est ducimus veniam quo galisum recusandae qui reiciendis atque ut ipsam aperiam est corporis dolore et consequatur ratione et doloremque velit. Et sint odit et atque sapiente rem temporibus quibusdam cum dolores officia non consequatur enim. Non exercitationem consectetur eos unde velit aut dolor incidunt eum officia impedit sed sunt fugit eos temporibus consequatur. Non molestias fugiat a atque dolorem aut sapiente doloremque et Quis accusamus est sint galisum.

Non harum dignissimos qui veritatis repudiandae vel necessitatibus exercitationem ut quaerat perferendis sed pariatur nihil? At quaerat molestiae sed quis esse et consequatur necessitatibus a quam unde non repellat culpa. Nam debitis laborum ex libero omnis ea numquam quod et saepe dolor et impedit adipisci sit voluptatibus cupiditate aut doloribus galisum. Eos voluptate modi aut numquam rerum sit eligendi distinctio.

Qui quae obcaecati quo repudiandae unde aut omnis labore ea animi officia rem temporibus quis sed nisi internos! Ut numquam magnam vel possimus sunt non optio saepe. Aut velit dignissimos et iusto iusto id facere repellat.

Aut sunt inventore et quia suscipit vel quia suscipit sit labore animi et cupiditate repellendus? Qui nemo esse est dicta consequatur est eveniet tempore. Id veniam accusantium aut dolorum perferendis rem eaque quod. Aut distinctio sequi non perspiciatis sunt aut sint quis 33 delectus placeat.

Ab architecto quia est inventore deleniti ex nesciunt nihil. Aut quasi possimus qui architecto officia sed facilis autem. Id nihil obcaecati sit rerum ullam est debitis cumque et quia tempore sed facere iusto a quibusdam iure. Est voluptatum assumenda quo provident culpa a tenetur autem eum iste molestiae.

Qui asperiores error est magni neque ut porro delectus non aspernatur reprehenderit quo praesentium quaerat qui eaque quidem. Est debitis accusantium qui tempora rerum eos dolore repellat ut sapiente repellat At tenetur ullam et maiores dolores.

Est voluptate galisum ut quaerat minus est tempora fugit et velit porro et libero ipsam. Sit laborum molestiae id voluptates consequuntur non rerum omnis ut consequuntur quaerat aut expedita sint. Ut distinctio culpa et tenetur quisquam qui tempora quia ea reiciendis nihil? Est nobis fugiat vel dolor tenetur aut laboriosam molestiae est praesentium dicta non quia quia.

Id illum vero sed internos tenetur est laboriosam galisum. Eos voluptas accusantium qui tempore dicta aut adipisci obcaecati. Qui quibusdam amet quo placeat animi in quibusdam sint sed voluptatem unde est mollitia veritatis id voluptatem dolor! Eos Quis suscipit et aliquid perferendis aut enim obcaecati et dolor facilis vel minima nemo ut officiis magni qui perferendis doloribus?

Et eligendi vitae id officia minima est galisum itaque eos molestiae harum in beatae error et dignissimos libero et dolor voluptas. Aut accusantium voluptas et laudantium dicta qui illum cupiditate est ipsum nisi. Ad exercitationem unde qui voluptatem sequi et impedit ratione in magni cumque sit quibusdam rerum qui eligendi eligendi ut vero nesciunt. Est voluptas provident est galisum laudantium cum eveniet molestiae sed alias maxime sed culpa similique.
Finally, add a featured image so it has one and update the post.
Next, add seven more posts with unique featured images, unique titles, unique opening sentences, and the same Ipsum Lorem text below the opening sentences. That way, you’ll quickly see that each one is different when you open your blog page later. These eight posts are only meant for testing purposes.
Download file with all pages and posts
To save time, click the link below to download the WordPress export file. Then, import it from Dashboard Tools > Import. Next, pick the WordPress plugin at the bottom to install, activate, and run the importer. You may need to add the featured images manually to each one.
Create page, blog, and post PHP files
WordPress uses specific PHP files when pages or posts are opened. For example, when you open your About-us page, WordPress uses page.php. If you open a blog post, WordPress uses single.php. These PHP files load and render the featured image, title and content programmatically. As such, the page structure and formatting are set within the file.
Now that you understand how these PHP files work, let’s quickly add theme divs to them so they function. After going through the following procedure, you’ll gain a basic understanding of the exact files used and what they do. Later, add other theme divs to these PHP files or modify them to match your design.
Put code into page.php for web pages
Use your page.php file to generate all standard pages created in WordPress, like your About and Services pages, as mentioned. This file automatically loads when you open a page in your browser. It presents the featured image, title and content the way you decide within page.php. For now, we’ll keep it simple.
Paste the following code into your page.php file:
<!DOCTYPE HTML> <!-- PAGE -->

<?php /* Gather all data from the WordPress Dashboard */
$info = array(
	'name'		=> get_bloginfo('name'),
	'desc'		=> get_bloginfo('description'),
	'uri'		=> get_template_directory_uri(),
	'url'		=> site_url(),
	'email'		=> get_option('email'),
	'phn'		=> get_option('phone'),
	'street'	=> get_option('street'),
	'city'		=> get_option('city'),
	'state'		=> get_option('state'),
	'zip'		=> get_option('zip'),
	'yt-url'	=> get_option('youtube_url'),
	'fb-url'	=> get_option('facebook_url'),
	'tw-url'	=> get_option('twitter_url'),
	'li-url'	=> get_option('linkedin_url'),
	'ig-url'	=> get_option('instagram_url')
);

get_header('',$info); ?>

<article class="page-wrap" id="post-<?php the_ID(); ?>" <?php post_class(); ?>> <!-- Set's the page id baed on id# given by WordPress -->
	<?php while(have_posts()){ ?> <!-- Check to see if the page exists and open session -->
		<div class="page-thumbnail"><?php the_post_thumbnail('large-entry-image'); ?></div> <!-- Put the featured image on the page -->
		<div class="page-content"> <!-- Wraps all page content -->
			<h1><?php single_post_title(); ?></h1> <!-- Put the page title on the page -->
			<?php the_post(); ?> <!-- Iterates the post index in the WordPress loop -->
			<div><?php the_content(); ?></div> <!-- Put the page content on the page contained in a <div></div> element -->
		</div><?php
	} ?>
	<style>
		.page-thumbnail {height:600px;}
		.page-wrap {width:900px;margin:0 auto;padding-top:140px;}
		.page-content {background:white;padding:40px;}
	</style>
</article>

<?php get_footer('',$info); ?>
Notice how page.php defines the $info array, loads the header with get_header(), and loads the footer with get_footer(). This is done the same way as your front-page.php file by passing the $info array to both.
The <article></article> element displays the page content using PHP WordPress functions. By using these functions like the_post and the_content, there’s no need for coding to access the WordPress database. Each function within the <article></article> element has a comment revealing what it does.
After declaring the $info array, page.php renders the page from your page created in WordPress. If the page exists – while(have_posts(), it pulls the thumbnail, title, and content and displays it.
Paste code into single.php for single posts
Your single.php file functions exactly the same as your page.php file, but for posts. Fortunately, having two separate PHP files like this allows you to format them differently, depending on your design.
Paste the following code into your single.php file:
<!DOCTYPE HTML> <!-- SINGLE POST -->

<?php /* Gather all data from the WordPress Dashboard */
$info = array(
	'name'		=> get_bloginfo('name'),
	'desc'		=> get_bloginfo('description'),
	'uri'		=> get_template_directory_uri(),
	'url'		=> site_url(),
	'email'		=> get_option('email'),
	'phn'		=> get_option('phone'),
	'street'	=> get_option('street'),
	'city'		=> get_option('city'),
	'state'		=> get_option('state'),
	'zip'		=> get_option('zip'),
	'yt-url'	=> get_option('youtube_url'),
	'fb-url'	=> get_option('facebook_url'),
	'tw-url'	=> get_option('twitter_url'),
	'li-url'	=> get_option('linkedin_url'),
	'ig-url'	=> get_option('instagram_url')
);

get_header('',$info); ?>

<article class="page-wrap" id="post-<?php the_ID(); ?>" <?php post_class(); ?>> <!-- Set's the page id baed on id# given by WordPress -->
	<?php while(have_posts()){ ?> <!-- Check to see if the page exists and open session -->
		<div class="page-thumbnail"><?php the_post_thumbnail('large-entry-image'); ?></div> <!-- Put the featured image on the page -->
		<div class="page-content"> <!-- Wraps all page content -->
			<h1><?php single_post_title(); ?></h1> <!-- Put the page title on the page -->
			<?php the_post(); ?> <!-- Iterates the post index in the WordPress loop -->
			<div><?php the_content(); ?></div> <!-- Put the page content on the page contained in a <div></div> element -->
		</div><?php
	}?>
	<style>
		.page-thumbnail {height:600px;}
		.page-wrap {width:900px;margin:0 auto;padding-top:140px;}
		.page-content {background:white;padding:40px;}
	</style>
</article>

<?php get_footer('',$info); ?>
SIDE NOTE: Both page.php and single.php have exactly the same content. That means, blog posts and pages will display the same way. Differentiate and customize them individually later. For now, they will both function and display nicely.
To learn how to create an amazing WordPress single.php file, check out: WordPress single.php file: Blog post design guide.
Add code to home.php for your blog page
This is the page that lists your blog posts. The name home.php is a bit deceptive since it’s not for your home page. In the early days of WordPress, your blog list page was your home page, and the PHP filename persists. front-page.php automatically loads for your homepage. Then, home.php loads your blog page.
To display your blog, home.php renders your post thumbnails, titles, and excerpts. In the following theme div to past into your home.php file, the latest post on top is big, and the posts that follow are smaller and alternate from let to right.
There are many popular ways to lay out your blog page. Later, replace or modify your home.php file to suite your design requirements. I’ll provide additional options later. For now, paste the following code into your home.php file to display your blog when visiting yourwebsite.com/blog/:
<!DOCTYPE HTML> <!-- BLOG LOOP -->
<?php /* Gather all data from the WordPress Dashboard */
$info = array(
'name' => get_bloginfo('name'),
'desc' => get_bloginfo('description'),
'uri' => get_template_directory_uri(),
'url' => site_url(),
'email' => get_option('email'),
'phn' => get_option('phone'),
'street' => get_option('street'),
'city' => get_option('city'),
'state' => get_option('state'),
'zip' => get_option('zip'),
'yt-url' => get_option('youtube_url'),
'fb-url' => get_option('facebook_url'),
'tw-url' => get_option('twitter_url'),
'li-url' => get_option('linkedin_url'),
'ig-url' => get_option('instagram_url')
);
get_header('', $info); ?>
<section class="blog-hero"> <!-- This theme div displays your blog title and description in the hero section -->
<div class="blog-title">
<h1><?php echo $info['name']; ?> Blog</h1>
<h2><?php echo $info['desc']; ?></h2>
</div>
<style>
.blog-hero {padding-top:140px;margin-bottom:80px;color:white;text-align:center;}
</style>
</section>
<section class="blog-loop"> <!-- This theme div displays your blog loop with pagination - set blog to display an odd number of posts to fill both columns evenly -->
<?php $i=1;$wordcount=18;$topwordcount=39; // # of words in each excerpt and top excerpt
while(have_posts()){ // While a post or the next post exists run the following PHP code:
the_post(); // Iterates the post index in the WordPress loop
if ($i==1) { ?> <!-- The following is for the first post on top and bigger when $i equals 1 -->
<div class="post-row left top-post">
<div class="post-img-col">
<a href="<?php the_permalink() ?>"> <!-- Function pulls the link to the post -->
<?php the_post_thumbnail('medium-entry-image'); ?> <!-- Function pulls the "medium-entry-image" sized featured imaged defined in functions.php -->
</a>
</div>
<ul class="post-col">
<li>
<h2 class="blog-title"><a href="<?php the_permalink() ?>" class="font-wht-teal"><?php the_title(); ?></a></h2> <!-- Pulls the link to the post again -->
<p><?php echo wp_trim_words(get_the_content(),$topwordcount,'...'); ?><a href="<?php the_permalink() ?>"> READ MORE</a></p> <!-- Creates an excerpt with from the content and adds "READ MORE" link - # of words set by $wordcount variable -->
</li>
</ul>
</div><?php
}
else { // Put all following posts below:
if ($i % 2 == 0) { ?> <!-- All even numbered posts -->
<div class="post-row-wrap">
<div class="post-row left">
<div class="post-img-col">
<a href="<?php the_permalink() ?>">
<?php the_post_thumbnail('small-entry-image'); ?>
</a>
</div>
<ul class="post-col">
<li>
<h2 class="blog-title"><a href="<?php the_permalink() ?>"><?php the_title(); ?></a></h2>
<p><?php echo wp_trim_words(get_the_content(),$wordcount,'...'); ?><a href="<?php the_permalink() ?>"> READ MORE</a></p>
</li>
</ul>
</div><?php
}
else { ?> <!-- All odd numbered posts -->
<div class="post-row right">
<ul class="post-col">
<li>
<h2 class="blog-title"><a href="<?php the_permalink() ?>"><?php the_title(); ?></a></h2>
<p><?php echo wp_trim_words(get_the_content(),$wordcount,'...'); ?><a href="<?php the_permalink() ?>"> READ MORE</a></p>
</li>
</ul>
<div class="post-img-col">
<a href="<?php the_permalink() ?>">
<?php the_post_thumbnail('small-entry-image'); ?>
</a>
</div>
</div>
</div> <?php
}
}
$i++;
}
if ($i % 2 !== 0) { ?></div><?php } ?>
<span class="blog-pagination"><?php echo paginate_links(); ?></span> <!-- Use WordPress built-in pagination function -->
<style>
.blog-loop {width:1200px;margin:0 auto;padding-top:180px;color:white;}
.blog-loop li {list-style-type:none!important;}
.blog-loop .post-row-wrap {
display:flex;flex-wrap:wrap;
justify-content:space-between;
width:1200px;
margin:20px auto;
}
.blog-loop .post-row {
border-radius:20px;
display:flex;align-items:center;
background:#333;
width:49.2%;
box-shadow:3px 3px 6px #222;
}
.blog-loop .top-post.post-row {width:1200px;margin:-160px auto auto;}
.blog-loop .post-row h2 {
margin:0 0 5px;
font-size:22px;
line-height:1;
}
.blog-loop .top-post.post-row h2 {
display:inline-block;
font-size:36px;
margin-bottom:10px;
}
.blog-loop .post-row p {margin:0;font-size:16px;}
.blog-loop .top-post.post-row p {font-size:23px;}
.blog-loop .post-row a {display:inline-block;color:lightblue;}
.blog-loop .post-row a:hover {color:lightgray;}
.blog-loop .post-col {padding:0 10px;margin:0;}
.blog-loop .top-post .post-col {padding:0 20px;}
.blog-loop .post-img-col img {transition:.2s ease;margin-bottom:-6px;}
.blog-loop .left img {border-radius:20px 0 0 20px;border-right:solid 1px #fff;}
.blog-loop .right img {border-radius:0 20px 20px 0;border-left:solid 1px #fff;}
.blog-loop .post-img-col img:hover {transition:.2s ease;border:none;}
.blog-loop .blog-pagination {
display:block;
margin:40px 20px;
text-align:center;
}
.blog-loop .page-numbers {
padding:10px 20px;
margin:5px;
background:#00587B;
color:#DCEFF7;
border-radius:10px;
transition:.2s ease;
box-shadow:3px 3px 6px #222;
}
.blog-loop .page-numbers.current {background:#008CC3;}
.blog-loop .page-numbers:hover {background:#008CC3;}
</style>
</section>
<?php get_footer('', $info); ?>
Within the Blog Loop section, the WordPress function wp_trim_words() is used to create the excerpt – it trims text to be a certain number of words. Then, the READ MORE link follows. Below is the breakdown:
wp_trim_words( get_the_content(), $wordcount, 'Additional content' );
get_the_content() retrieves the entire post content. Then, the $wordcount, which is defined near the top, sets the number of words in the excerpt. Finally, the Additional content may contain text or HTML. In this case, it contains “…” followed by a link to the post with “READ MORE” added after the function.
Paste code into index.php for your fallback page
When WordPress isn’t able to find the requested PHP file, it loads your index.php file. Although this page has many content options, we’ll keep it simple for now. Paste the following code into your index.php file:
<!DOCTYPE HTML> <!-- INDEX.PHP PAGE -->

<?php /* Gather all data from the WordPress Dashboard */
$info = array(
	'name'		=> get_bloginfo('name'),
	'desc'		=> get_bloginfo('description'),
	'uri'		=> get_template_directory_uri(),
	'url'		=> site_url(),
	'email'		=> get_option('email'),
	'phn'		=> get_option('phone'),
	'street'	=> get_option('street'),
	'city'		=> get_option('city'),
	'state'		=> get_option('state'),
	'zip'		=> get_option('zip'),
	'yt-url'	=> get_option('youtube_url'),
	'fb-url'	=> get_option('facebook_url'),
	'tw-url'	=> get_option('twitter_url'),
	'li-url'	=> get_option('linkedin_url'),
	'ig-url'	=> get_option('instagram_url')
);

get_header('',$info); ?>

<section class="index-hero"> <!-- This theme div displays your website title and description -->
	<div class="site-title">
		<h1><?php echo $info['name']; ?></h1>
		<h2><?php echo $info['desc']; ?></h2>
	</div>
	<style>
		.index-hero {padding-top:140px;margin-bottom:80px;color:white;text-align:center;}
	</style>
</section>

<?php get_footer('',$info); ?>
Now that you’ve added this content to your index.php file, it will present your header, basic info, and footer. The header and footer menus will allow visitors to navigate back to your main website content. In the future, you’ll create a 404 page-not-found handler to handle broken links or URL typos in a more elegant way. For now, this index.php file will work.
Create custom fields using admin.php
When I create WordPress themes, I use the admin.php file to create fields within the WordPress Dashboard. Although you can use this file to create entire sections in your Dashboard, I keep it small and basic for website performance reasons. Therefore, I only use the Dashboard for basic information only.
Keeping all customization within the code vs. using theme builders or Dashboard sections provides two advantages. First, your website will perform better without the overhead – limiting database accesses reduces load times. Second, the more you customize your site withing each theme div, the better you get at actual coding.
Now, paste the following code into your empty admin.php file:
<?php //  // ADMIN.PHP - Adds fields to Settings > General in the WordPress Dashboard for basic info

add_action('admin_init', 'my_general_section');
function my_general_section() {

	// Add a section of fields to Settings > General called "CONTACT INFO:"
    add_settings_section( // Creates the section to hold the contact info fields
        'contact_settings_section', // Section identifier
        'CONTACT INFO:', // Section title
        'section_options_callback', // Callback
        'general' // Creates the section in Settings > General in the Dashboard
    );
	// Add another section called "SOCIAL MEDIA INFO:" for social media links - same structure as above but condensed
    add_settings_section('social_media_settings_section','SOCIAL MEDIA INFO:','section_options_callback','general');

	// Add the first field to the CONTACT INFO section
    add_settings_field( // Create the field for email
        'email', // Option ID
        'Email', // Label displayed in the CONTACT INFO section
        'textbox_callback', // !important - This is where the info goes
        'general', // The page for this field: Settings > General in the Dashboard
        'contact_settings_section', // Section identifier
        array( // Add Email to the array
            'email' // Must match Option ID
        )
    );

	// Add additional fields to the CONTACT INFO section - same structure as above but condensed
    add_settings_field('phone','Phone','textbox_callback','general','contact_settings_section',array('phone'));
	add_settings_field('street','Street','textbox_callback','general','contact_settings_section',array('street'));
	add_settings_field('city','City','textbox_callback','general','contact_settings_section',array('city'));
	add_settings_field('state','State','textbox_callback','general','contact_settings_section',array('state'));
	add_settings_field('zip','Zip','textbox_callback','general','contact_settings_section',array('zip'));

	// Add additional fields to the SOCIAL MEDIA INFO section - condensed
	add_settings_field('facebook_url','Facebook URL','textbox_callback','general','social_media_settings_section',array('facebook_url'));
	add_settings_field('linkedin_url','Linkedin URL','textbox_callback','general','social_media_settings_section',array('linkedin_url'));
	add_settings_field('youtube_url','YouTube URL','textbox_callback','general','social_media_settings_section',array('youtube_url'));
	add_settings_field('twitter_url','Twitter URL','textbox_callback','general','social_media_settings_section',array('twitter_url'));
	add_settings_field('instagram_url','Instagram URL','textbox_callback','general','social_media_settings_section',array('instagram_url'));

	// Register each field one-by-one
	// CONTACT INFO
    register_setting('general','email','esc_attr');
	register_setting('general','phone','esc_attr');
	register_setting('general','street','esc_attr');
	register_setting('general','city','esc_attr');
	register_setting('general','state','esc_attr');
	register_setting('general','zip','esc_attr');
	// SOCIAL MEDIA INFO
	register_setting('general','facebook_url','esc_attr');
	register_setting('general','linkedin_url','esc_attr');
	register_setting('general','twitter_url','esc_attr');
	register_setting('general','youtube_url','esc_attr');
	register_setting('general','instagram_url','esc_attr');
}

// Functions to set the SECTIONS and FIELDS
function section_options_callback() { // Section Callback
    echo '';
}
function textbox_callback($args) {  // Textbox Callback
    $option = get_option($args[0]);
    echo '<input type="text" id="'.$args[0].'" name="'.$args[0].'" value="'.$option.'" />';
}
admin.php is made up of three functions:
my_general_section()adds two Dashboard field sections, all fields, and registers themsection_options_callback()sets the two field sections in the Dashboardtextbox_callback($args)sets the fields, each as a form<input>
Within the my_general_section() function, the first instances of add_settings_section() and add_settings_field() WordPress functions are laid out for readability. After the first instance, the next instances are compacted.
Walk through each WordPress function in your admin.php file:
add_action()adds a function to an action hook in WordPressadd_settings_section()adds a new section to a settings page in the WordPress Dashboardadd_settings_field()adds a new field to a section of a settings page in the WordPress Dashboardregister_setting()registers a setting and its data after it was added to a section
At this point, the only file without content is your script.js file, which we won’t be using for this basic theme. Later, you can add JAVA scripts for image sliders and other automations or animations. In the future, paste each script you use for your website into script.js to keep them all in one place.
Fully test your new theme
Now that you’ve completed the basics and understand how to make a WordPress theme, it’s time to test it out. First, go into your WordPress Dashboard and activate your theme: Appearance > Themes. Next, refresh your browser to reload the Dashboard.
Enter your data
With your theme activated and your page refreshed, admin.php should’ve added custom fields to your Settings > General Dashboard page. Navigate there and confirm these fields exist below the standard fields, as shown on the right.
Fill in each field along with the fields at the top like Title and Tagline. Just use homepage links for social media like “facebook.com” to save time. Then hit Save at the bottom of the page. Now you can test your website and confirm that it pulls in all of this information correctly.
Test your website
In the top-left corner, there’s a house icon and your site title. Hover over it and click “Visit Site” to check your website. Once loaded, scroll down and confirm everything is there and looks correct. Check every detail from top to bottom.
Hover over every link to confirm it changes from light blue to light gray. Then, click on each link to make sure it opens correctly. Do this from top to bottom starting with your social-media icons, email, and phone number at the top.
Test your menu to make sure every page loads and displays correctly. Next, click on each page to confirm the menu item is overlined. Literally click on everything to test it on every page. Attention to detail will put you on a level above your competition.
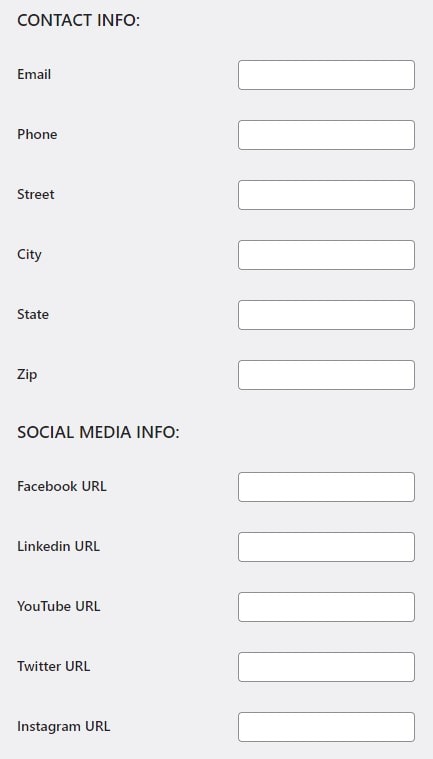
Troubleshoot to finish learning how to make a WordPress website
If you spot an error, check the file where the error resides. In other words, if the menu doesn’t display correctly, the error is probably in your header.php file. Any error at the bottom may be your footer.php file. If a page doesn’t look right, check its PHP file – page.php for standard pages, home.php for blog page, and single.php for a blog post.
Images for comparing your WordPress website
Although your featured images and starting sentences will be different, your pages and posts should look like these. Review every detail to confirm that everything looks the same. If you know CSS, you may have made some changes to the look, so take that into account.

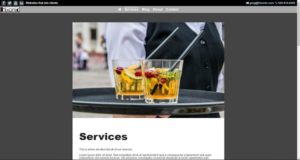
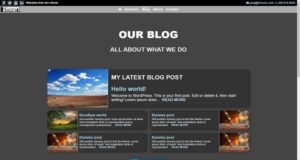
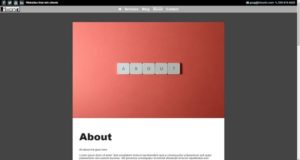
As a final test, confirm your index.php file functionality. Do this by entering a false URL like yourwebsite.com/test/. A page should load with your website title and tagline. It should have the header and footer displayed correctly. Later, I’ll show you how to create a 303 page that reveals that page doesn’t exist. But for now, it stays in your domain, which is the most important aspect of index.php.
Zip & install your theme on yourwebsite.com
There’s a WordPress plugin that works well for managing your website files and archiving custom themes. It’s called File Manager Advanced by modalweb. In the WordPress Dashboard of theme.yourwebsite.com, go to Plugins and click the “Add New” button. Then, enter File Manager Advanced and wait for it to show up. Click “Install” and then click “Activate”
Once activated, “File Manager” appears near the top in the left column of your WordPress Dashboard – it has a yellow folder icon. Click that and navigate to wp-content > themes > your-theme. Right-click on your-theme folder and click download. Now a zipped theme archive is in your computer’s downloads folder.
Download the complete theme, pages, and posts here
To download a complete copy of this starter WordPress theme, click the following link:
Install your WordPress theme to its final destination
In the WordPress Dashboard of yourwebsite.com, go to Plugins and click on the “Add New” button in the top-left corner. Then, click on the “Upload Plugin” button in the top-left corner. Next, click on “Choose File” and select your downloaded file in your downloads folder. Finally, click “Install Now.”
Now, go into Customize > Themes, pick your new theme and activate it. Next, create your Home and Blog pages and set static page, Home and Blog as before. Be sure to set the number of posts-per-page to an odd number like five.
Finally, recreate your About and Services pages so they exist. Only add content to them as you wish – they will load when selected from your menu.
Test it again – now you know how to make a WordPress theme
Now that your new WordPress theme is installed on yourwebsite.com, open your website, click on everything, and confirm all. functionality. This step also acts as a second review in case you missed something the first time around. Now, start adding real content to yourwebsite.com.
You’ve done it! You now know how to make a WordPress theme from scratch. The next step is customization and adding more theme divs to your front-page.php and other page files. Subscribers have access to my extensive library of theme divs for every part of your website. As a subscriber, copy and modify them as you wish!