Custom WordPress dashboard: The field guide
If you build your own WordPress themes and want customize your WordPress dashboard, you’re in the right place. In this guide, learn how to add custom fields within your WordPress dashboard panel that store data. Then, learn how to create a custom WordPress dashboard widget with fields that capture information right from your dashboard. As such, store important information to use within your content and anywhere on your website.
Pulling data from your WordPress database takes time. As such, hard coding data into your theme increases performance. But there’s a problem with that. It’s cumbersome and inflexible. Also, it prevents your client’s ability to add or change their data themselves. Therefore, build a custom WordPress dashboard to store data. Then, only access that data once and store it in an array variable for multiple uses by your theme. I’ll show you how.
Why learn how to make a custom WordPress dashboard and theme?
This is an easy question to answer having so many great answers to choose from. In fact, this applies to both the back end and the front end of your website. To clarify, the back end stores your website and data – the server and database. The final HTML displayed in the browser constitutes the front end – the UI (User Interface).
Although amazing websites are built from scratch without WordPress, there are two things that make WordPress outstanding. First, WordPress boasts the best CMS (Content Management System) in the world. Second, it provides an extensive set of pre-made PHP functions, greatly reducing the amount of coding required. In other words, use the power of a great platform that is free to use – no heavy lifting required!
Your WordPress dashboard already stores data for your site title, tagline, URL (website address), and URI (theme location). As you’ll see, that data is easily accessed using built-in WordPress functions like get_bloginfo(). To add fields for contact information, social media links, and more, create a custom WordPress dashboard. Then enter that data and access it from your theme.
In this guide, uncover how to make a custom WordPress dashboard for your own theme. You’ll be able to do this from scratch, piece-by-piece. I’ll provide the template and the code to paste in for each part. Then, modify the code for your own design – learn it all right here. Now, read on to see how this is done.
Quick WordPress functions overview
To avoid extensive PHP programming while creating your custom WordPress dashboard, use built-in WordPress functions. As you’ll see, WordPress provides a huge functions library to perform every task imaginable within your theme. Provided in this guide, the surrounding code and theme divs contain WordPress functions that perform the heavy lifting for you.
Symbols for comments in CSS, HTML, PHP & JAVA
Each language (CSS, HTML, PHP, and JAVA) uses different symbols for comments. Below is a quick symbol reference:
//is used for PHP comments – everything on the same line after this symbol is a comment/*signifies both PHP and CSS comments within/* and */and can span multiple lines<!--signifies an HTML comment within<!-- and -->and can span multiple lines
Basic theme to use for your custom WordPress dashboard experiments
To download a basic theme containing all of the folders and files needed, click on COMPLETE BASIC THEME zip file. The WordPress admin.php file in that theme already contains the completed WordPress functions shown in the next section.
Add custom WordPress dashboard fields
Since the WordPress dashboard panel Settings > General already contains your site title, tagline, URL and URI, let’s add some additional fields to that panel. To begin, we’ll add two field groups, one for contact info and the other for social media links.
Create the admin.php file
Using your code editor, create a blank file in your theme root /includes folder – create the folder if it doesn’t exist. For instructions on how to set up your code editor, check out: Website hosting and your code editor.
Using the admin.php file, we’ll add PHP for the two field groups called sections. Within the PHP, create those field sections using the add_settings_section() WordPress function. Then, add the fields to each group using add_settings_field(). Finally, register_setting() registers each setting and its data.
Keeping all customization within the code vs. using theme builders or Dashboard sections provides two advantages. First, your website will perform better without the overhead – limiting database accesses reduces load times. Second, the more you customize your site withing each theme div, the better you get at actual coding.
Custom WordPress dashboard panel PHP
Now, paste the following code into your empty admin.php file:
<?php //  // ADMIN.PHP - Adds fields to Settings > General in the WordPress Dashboard for basic info

add_action('admin_init', 'my_general_section');
function my_general_section() {

	// Add a section of fields to Settings > General called "CONTACT INFO:"
    add_settings_section( // Creates the section to hold the contact info fields
        'contact_settings_section', // Section identifier
        'CONTACT INFO:', // Section title
        'section_options_callback', // Callback
        'general' // Creates the section in Settings > General in the Dashboard
    );
	// Add another section called "SOCIAL MEDIA INFO:" for social media links - same structure as above but condensed
    add_settings_section('social_media_settings_section','SOCIAL MEDIA INFO:','section_options_callback','general');

	// Add the first field to the CONTACT INFO section
    add_settings_field( // Create the field for email
        'email', // Option ID
        'Email', // Label displayed in the CONTACT INFO section
        'textbox_callback', // !important - This is where the info goes
        'general', // The page for this field: Settings > General in the Dashboard
        'contact_settings_section', // Section identifier
        array( // Add Email to the array
            'email' // Must match Option ID
        )
    );

	// Add additional fields to the CONTACT INFO section - same structure as above but condensed
    add_settings_field('phone','Phone','textbox_callback','general','contact_settings_section',array('phone'));
	add_settings_field('street','Street','textbox_callback','general','contact_settings_section',array('street'));
	add_settings_field('city','City','textbox_callback','general','contact_settings_section',array('city'));
	add_settings_field('state','State','textbox_callback','general','contact_settings_section',array('state'));
	add_settings_field('zip','Zip','textbox_callback','general','contact_settings_section',array('zip'));

	// Add additional fields to the SOCIAL MEDIA INFO section - condensed
	add_settings_field('facebook_url','Facebook URL','textbox_callback','general','social_media_settings_section',array('facebook_url'));
	add_settings_field('linkedin_url','Linkedin URL','textbox_callback','general','social_media_settings_section',array('linkedin_url'));
	add_settings_field('youtube_url','YouTube URL','textbox_callback','general','social_media_settings_section',array('youtube_url'));
	add_settings_field('twitter_url','Twitter URL','textbox_callback','general','social_media_settings_section',array('twitter_url'));
	add_settings_field('instagram_url','Instagram URL','textbox_callback','general','social_media_settings_section',array('instagram_url'));

	// Register each field one-by-one
	// CONTACT INFO
    register_setting('general','email','esc_attr');
	register_setting('general','phone','esc_attr');
	register_setting('general','street','esc_attr');
	register_setting('general','city','esc_attr');
	register_setting('general','state','esc_attr');
	register_setting('general','zip','esc_attr');
	// SOCIAL MEDIA INFO
	register_setting('general','facebook_url','esc_attr');
	register_setting('general','linkedin_url','esc_attr');
	register_setting('general','twitter_url','esc_attr');
	register_setting('general','youtube_url','esc_attr');
	register_setting('general','instagram_url','esc_attr');
}

// Functions to set the SECTIONS and FIELDS
function section_options_callback() { // Section Callback
    echo '';
}
function textbox_callback($args) {  // Textbox Callback
    $option = get_option($args[0]);
    echo '<input type="text" id="'.$args[0].'" name="'.$args[0].'" value="'.$option.'" />';
}
admin.php is made up of three functions:
my_general_section()adds two Dashboard field sections, all fields, and registers themsection_options_callback()sets the two field sections in the Dashboardtextbox_callback($args)sets the fields, each as a form<input>
Within the my_general_section() function, the first instances of add_settings_section() and add_settings_field() WordPress functions are laid out for readability. After the first instance, the next instances are compacted.
Walk through each WordPress function in your admin.php file:
add_action()adds a function to an action hook in WordPressadd_settings_section()adds a new section to a settings page in the WordPress Dashboardadd_settings_field()adds a new field to a section of a settings page in the WordPress Dashboardregister_setting()registers a setting and its data after it was added to a section
Test your custom WordPress dashboard
Go into your WordPress dashboard panel Settings > General and scroll down to confirm the new fields were added. Then, fill them all in with something and hit save at the bottom. The fields should remain filled.
Create My Info page to display your data
Before adding a new page for this in WordPress, go into your code editor and create a blank page template file called page-my-info.php. This file goes in the root directory of your theme. For instructions on how to set up your code editor, check out: Website hosting and your code editor.
The following code provides example content to display all of your data. Later, use it in a more creative way within your own web page content. Now, add the following code to that file:
<!DOCTYPE HTML> <!-- MY INFO PAGE -->

<?php // Gather all info from the WordPress Dashboard Settings > General stored in the database
$info = array( // Put all data into an array to only call it once from the database
  'name'	=> get_bloginfo('name'),
  'desc'	=> get_bloginfo('description'),
  'uri'		=> get_template_directory_uri(),
  'url'		=> site_url(),
  'email'	=> get_option('email'),
  'phn'		=> get_option('phone'),
  'street'	=> get_option('street'),
  'city'	=> get_option('city'),
  'state'	=> get_option('state'),
  'zip'		=> get_option('zip'),
  'yt-url'	=> get_option('youtube_url'),
  'fb-url'	=> get_option('facebook_url'),
  'li-url'	=> get_option('linkedin_url'),
  'ig-url'	=> get_option('instagram_url')
);
?>
<h1><?php echo $info['name']; ?>'s Information</h1>
<h2><?php echo $info['desc']; ?></h2>
<p>My email is: <?php echo $info['email']; ?></p>
<p>My phone is: <?php echo $info['phn']; ?></p>
<p>My street is: <?php echo $info['street']; ?></p>
<p>My city is: <?php echo $info['city']; ?></p>
<p>My state is: <?php echo $info['state']; ?></p>
<p>My zip is: <?php echo $info['zip']; ?></p>
<p>My YouTube is: <?php echo $info['yt-url']; ?></p>
<p>My Facebook is: <?php echo $info['fb-url']; ?></p>
<p>My Linkedin is: <?php echo $info['li-url']; ?></p>
<p>My Instagram is: <?php echo $info['ig-url']; ?></p>
<p>Now, click <a href="<?php echo $info['url']; ?>">HOME</a> to go back</p>
After you save this file, go into your WordPress dashboard and create a new page. Set the page title to “My Info” and the slug will automatically set to “my-info.” Save the page and then go there. Either click on the link “view page” or simply enter your URL/my-info/ and your new page will open. It shows all of your data entered into Settings > General fields.
Use this page as an example of how to present your info within your content. As an example, your header may show your social media links, email and phone number. Then, your Front Page will show your title and tagline. Finally, your footer may show your social media links again and your contact information. Since the data is placed in an array, it is accessed from the database only once.
The $info array explained
In the page-my-info.php file, $info[‘name’] contains the website title as retrieved by the WordPress function get_bloginfo(‘name’). The word ‘name’ is the key that contains your site title that is entered into the Dashboard panel Settings > General and saved in the database.
To further explain how a PHP array is assembled, the array variable $info is filled with elements called key => value pairs within the array() PHP construct. It takes any number of comma-separated key => value pairs as arguments. See the structure below:
array(

key  => value,

key2 => value2,

key3 => value3,

...Add as many 'key => value' pairs as you wish

)
Custom WordPress dashboard widgets
Another way to add custom WordPress dashboard fields is to insert dashboard widgets right to the main dashboard panel. The main WordPress function used to add Dashboard Widgets is wp_add_dashboard_widget(). This function is easy to use and it is quite powerful.
Start by cleaning up your WordPress dashboard. Do this by selecting the Screen Options pull-down menu at the top right of the dashboard. Click it and uncheck everything in the pull-down Screen Options menu. Once all is unchecked, you’ll have a clean dashboard with some empty boxes. Ignore those for now.
Now, let’s add the same fields that are added to your WordPress dashboard panel Settings > General page. Do this by pasting the following code to the bottom of your admin.php file:
// Add a contact and social-media info dashboard widgets
if(isset($_POST['form_submit'])) { // Capture the form data submitted by the forms using POST method
// Update each value submitted
update_option( 'phone', $_POST['phone'] );
update_option( 'email', $_POST['email'] );
update_option( 'street', $_POST['street'] );
update_option( 'city', $_POST['city'] );
update_option( 'state', $_POST['state'] );
update_option( 'zip', $_POST['zip'] );
update_option( 'youtube_url', $_POST['yt-url'] );
update_option( 'facebook_url', $_POST['fb-url'] );
update_option( 'linkedin_url', $_POST['li-url'] );
update_option( 'instagram_url', $_POST['ig-url'] );
}
add_action('wp_dashboard_setup','create_info_dashboard_widget'); // Hook info dashboard widget created by 'create_dashboard_widget' function
function create_info_dashboard_widget() { // Create the dashboard widget
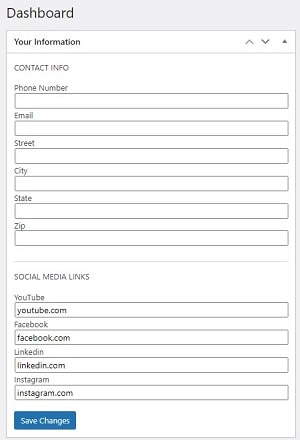
wp_add_dashboard_widget('info_widget_id','Your Information','info_dashboard_widget_output');
}
function info_dashboard_widget_output() { // Output form contents to dashboard widget ?>
<form method="post">
<p>CONTACT INFO</P>
<label for="phone">Phone Number </label><br><input name="phone" size="60" value="<?php echo get_option('phone'); ?>" style="width:100%;" />
<label for="email">Email </label><br><input name="email" size="60" value="<?php echo get_option('email'); ?>" style="width:100%;" />
<label for="street">Street </label><br><input name="street" size="60" value="<?php echo get_option('street'); ?>" style="width:100%;" />
<label for="city">City </label><br><input name="city" size="60" value="<?php echo get_option('city'); ?>" style="width:100%;" />
<label for="state">State </label><br><input name="state" size="60" value="<?php echo get_option('state'); ?>" style="width:100%;" />
<label for="zip">Zip </label><br><input name="zip" size="60" value="<?php echo get_option('zip'); ?>" style="width:100%;" />
<br><br><hr>
<p>SOCIAL MEDIA LINKS</P>
<label for="yt-url">YouTube </label><br><input name="yt-url" size="60" value="<?php echo get_option('youtube_url'); ?>" style="width:100%;" />
<label for="fb-url">Facebook </label><br><input name="fb-url" size="60" value="<?php echo get_option('facebook_url'); ?>" style="width:100%;" />
<label for="li-url">Linkedin </label><br><input name="li-url" size="60" value="<?php echo get_option('linkedin_url'); ?>" style="width:100%;" />
<label for="ig-url">Instagram </label><br><input name="ig-url" size="60" value="<?php echo get_option('instagram_url'); ?>" style="width:100%;" />
<br><br>
<input type="submit" class="button-primary" name="form_submit" value="Save Changes">
</form> <?php
}
Save your admin.php file. Also, read through the code to develop an understanding. There are comments that explain how each part functions. Notice that the same fields from your Settings > General dashboard panel are used here too.
Let’s walk through the code:
if(isset($_POST['form_submit']))captures form data submitted using POST methodupdate_option()updates the value of an option that was already addedadd_action()adds a function to an action hook in WordPresswp_add_dashboard_widget()adds a new dashboard widget- Form submission is handled with the POST method at the top
Test your custom WordPress dashboard widget
After saving your admin.php file, go into your WordPress dashboard. Since you’ve removed all widgets ahead of time by unchecking them, you will only see one widget – your custom WordPress dashboard widget. In it, all fields are in place.
The fields within this custom WordPress dashboard widget are the same fields that you have in your Settings > General panel. In fact, when you change a field in your dashboard, it updates in your Settings > General panel and vise versa. Give that a try.
Now that you know how to create a custom WordPress dashboard with additional fields and a dashboard widget, play with it and make it your own. Both methods work well and can be used for entirely different types of data. Also, when you update the fields in this custom WordPress dashboard widget, the data on the My Info page will update automatically.
To learn how to create an entire WordPress theme from scratch, piece-by-piece, be sure to check out: HOW TO MAKE A WORDPRESS THEME.