
WordPress single.php file: Blog post design guide
As you create your WordPress theme, blog post design suffers indifference. That’s because your homepage design consumes your attention. Then, the rest is just dotting the I’s and crossing the T’s. But that shouldn’t be the case since blog posts are responsible for the majority of your SEO – they bring in the traffic. As such, let’s put some focus on your WordPress single.php file and build some blog post designs that impress visitors.
Being mostly textural content, blog posts rendered by your WordPress single.php file don’t need many frills. They should look clean and have high contrast for readability. As you’ll see, blog posts that look awesome are bookmarked and shared more often. More importantly, blog posts should lead readers to your CTA (Call To Action).
The way you write your content has the biggest impact on how well your blog posts maintain attention and convert visitors into subscribers – that’s entirely up to you. But the layout and visual aspects of your blog post certainly contribute to the success. Therefore, after building the basics to get your blog posts working, we’ll cover a few designs to make your own. I’ll show you how to work with them in this design guide.
Continue reading to learn how to build a great WordPress single.php file that presents your posts in various ways.
Theme divs explained
Every theme div you add is complete and self contained, similar to a plugin, but without overhead. As such, each includes CSS within <style> tags – the <style></style> element. Then, surrounding code frames your theme divs, defines functionality, or declares data.
You will add theme divs to different theme files depending on where they show up on your website. As you’ll see, most of your theme PHP files are declared as HTML files. That means, most theme files will contain the <!DOCTYPE HTML> tag at the top.
As you add HTML content to your theme files, you’ll notice that they contain PHP within the HTML. WordPress PHP functions are used to place data within the HTML to be rendered in the browser. To explain, these functions pull data from the database so you don’t have to write additional PHP code.
Cut and paste the CSS from each theme div to each appropriate CSS file in your theme. That will help organize your theme and your website will perform better. There are two advantages to doing it this way:
- Each theme div is plug-and-play and self-contained – they work once pasted in
- Learning and practice you receive throughout the entire process
Basic theme for your WordPress single.php file
If you need a basic theme for your WordPress single.php file, just download Complete theme zip file. If you want to learn how to build a WordPress theme from scratch, check out HOW TO MAKE A WORDPRESS THEME. Then, to build an amazing front-page.php file, click on MAKE AN AMAZING WORDPRESS FRONT-PAGE.PHP FILE. Finally, to build an awesome page.php file, check out How to build a great WordPress page.php file.
Install your WordPress theme to its final destination
In the WordPress Dashboard of yourwebsite.com, go to Plugins and click on the “Add New” button in the top-left corner. Then, click on the “Upload Plugin” button in the top-left corner. Next, click on “Choose File” and select your downloaded file in your downloads folder. Finally, click “Install Now.”
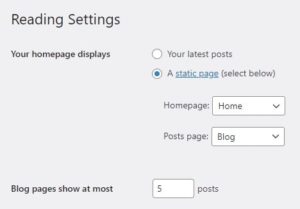
After installing the theme, go into Customize > Themes, pick your new theme and activate it. Next, create your Home and Blog pages and set static page, Home and Blog.
The final step to setting up your standard web pages is to set your Blog and Home pages in the WordPress Dashboard: Settings > Reading.
Give life to your WordPress single.php file
WordPress uses specific PHP files when pages or posts are opened. For example, when you open your About-us page, WordPress uses page.php. If you open a blog post, WordPress uses single.php. These PHP files load and render the featured image, title and content programmatically. As such, the WorePress single.php file formats the page structure.
Your single.php file functions exactly the same as your page.php file, but for posts. Fortunately, having two separate PHP files like this allows you to format them differently, depending on your design.
Paste the following code into your single.php file to bring it to life:
<!DOCTYPE HTML> <!-- SINGLE POST -->

<?php /* Gather all data from the WordPress Dashboard */
$info = array(
  'name'    => get_bloginfo('name'),
  'desc'    => get_bloginfo('description'),
  'uri'    => get_template_directory_uri(),
  'url'    => site_url(),
  'email'    => get_option('email'),
  'phn'    => get_option('phone'),
  'street'  => get_option('street'),
  'city'    => get_option('city'),
  'state'    => get_option('state'),
  'zip'    => get_option('zip'),
  'yt-url'  => get_option('youtube_url'),
  'fb-url'  => get_option('facebook_url'),
  'tw-url'  => get_option('twitter_url'),
  'li-url'  => get_option('linkedin_url'),
  'ig-url'  => get_option('instagram_url')
);

get_header('',$info); ?>

<section class="page-wrap" id="post-<?php the_ID(); ?>" <?php post_class(); ?>> <!-- Set's the page id baed on id# given by WordPress -->
  <?php while(have_posts()){ ?> <!-- Check to see if the page exists and open session -->
    <div class="page-thumbnail"><?php the_post_thumbnail('large-entry-image'); ?></div> <!-- Put the featured image on the page -->
    <div class="page-content"> <!-- Wraps all page content -->
      <h1><?php single_post_title(); ?></h1> <!-- Put the page title on the page -->
      <?php the_post(); ?> <!-- Iterates the post index in the WordPress loop -->
      <div><?php the_content(); ?></div> <!-- Put the page content on the page contained in a <div></div> element -->
    </div><?php
  }?>
  <style>
    .page-thumbnail {height:600px;}
    .page-wrap {width:900px;margin:0 auto;padding-top:140px;}
    .page-content {background:white;padding:40px;}
  </style>
</section>

<?php get_footer('',$info); ?>
Now let’s walk through the contents of this WordPress single.php file so you understand it a little better.
WordPress single.php contents explained
At the top, declare the WordPress single.php file as HTML. As such, embed the PHP within the HTML. Also, this file renders a single post – when you open a blog post, this file renders it in the browser.
The next item is the building of an array variable, after opening a PHP session using <?php. Pull the contents from the WordPress dashboard and place them into this array. The advantage to doing this is simple. Load info from the database only once. Then, use elements within the array throughout your website without accessing the database again-and-again, which takes time and increases website loading times. Slow websites hurt SEO.
PHP array variables explained
To further explain how a PHP array is assembled, the array variable $info is filled with elements called key => value pairs within the array() PHP construct. It takes any number of comma-separated key => value pairs as arguments. See the structure below:
array(

key  => value,

key2 => value2,

key3 => value3,

...Add as many 'key => value' pairs as you wish

)
In the $info array variable, the first four items are pulled from standard fields in your WordPress dashboard Settings > General panel – site title and so on. Then, pull the next items from custom WordPress dashboard fields. Create these fields from your admin.php file. Click the links for the file contents and explanations.
After the array variable declaration is the WordPress function that calls your header: get_header('',$info). This function calls your header template file header.php. Also, place the $info array variable within the parenthesis to passed it to your header file so it doesn’t need to access your WordPress database. At the bottom, the get_footer('',$info) does the same thing, loading your footer template file footer.php.
For a detailed explanation of your header.php file along with great design and layout examples, check out: How to build your header.php WordPress file. Then, to get some great insight into your footer.php file, also with layout and design examples, take a look at: WordPress footer.php file REVEALED.
Rendering the post image, title and content
Within the <section></section> element that contains the entire theme div, the WordPress single.php file loads the blog post from the blog loop. In short, the blog loop uses PHP code to display posts. Using the blog loop, WordPress processes each post to be displayed using the WordPress single.php file. The <section></section> element itself builds the id from the post id within the loop.
Next, it checks to see if the post exists using the PHP expression while(have_posts()). The WordPress function have_posts() lies within the while-loop expression. It determines whether there are more posts available in the main WP_Query object to loop over. Additionally, it calls have_posts() method on the global $wp_query object.
Full-width Spatial-Presentation post design
Now that you have the basics of your WordPress single.php file and a functional version, let’s look at an interesting design to use. The following design example will replace the theme div in the above basic version. In other words, the <section> element and all of it’s contents will be replaced. Then, some theme divs will be added after the post rendering theme div to show latest blog posts and present a CTA (Call To Action).
If your blog posts present products or services, this blog-post layout is perfect for your website. It provides a full-width banner on top using your featured image and plenty of whitespace around every element and paragraph.
Add image-size functions first
The first task is to set your featured image and thumbnail sizes in functions.php. Add the following code to your functions.php file:
// Adds new featured image sizes by pixels - horizontal px, vertical px
add_image_size('full-width-image',1920,670,true);
add_image_size('medium-image',360,125,true);
add_image_size('small-image',180,62,true);
add_theme_support('post-thumbnails'); // add this if you don't already have it in your theme
To explain the functions you just pasted into your functions.php file, add_image_size() registers new image sizes used by your theme. The two numbers represent the horizontal and vertical size of each image in pixels. Both image sizes have the same aspect ratio.
After setting image sizes, make sure your functions.php file contains add_theme_support('post-thumbnails'). If it already does, just delete one of the instances of that function. Now your theme supports post featured images and the correct images sizes for this WordPress single.php file.
WordPress single.php Spatial-Presentation Post contents
The next step is to add the contents of the WordPress single.php Spatial-Presentation post theme layout. In the theme div, the HTML and CSS below it work together to render the layout of your posts. Paste the following theme div over the theme div currently there, from <section> to </section> and everything in between.
<section class="page-wrap" id="post-<?php the_ID(); ?>" <?php post_class(); ?>> <!-- Set's the page id baed on id# given by WordPress -->
  <?php while(have_posts()){ ?> <!-- Check to see if the page exists and open session -->
    <?php the_post_thumbnail('full-width-image'); ?> <!-- Put the featured image on the page -->
    <div class="page-content"> <!-- Wraps all page content -->
      <h1><?php single_post_title(); ?></h1> <!-- Put the page title on the page -->
      <?php the_post(); ?> <!-- Iterates the post index in the WordPress loop -->
      <div><?php the_content(); ?></div> <!-- Put the page content on the page contained in a <div></div> element -->
    </div><?php
  } ?>
  <style>
    .page-wrap {padding:80px 10px;background:white;}
    .wp-post-image {
      width:100%;
      height:auto;
      object-fit:contain;
    }
    .page-wrap h1 {margin:80px auto;text-align:center;}
    .page-wrap h2 {
      padding:80px 20px 0;
      margin:80px auto 40px;
      text-align:center;
      border-top:solid 1px lightgray;
    }
    .page-wrap h3,.page-wrap p {max-width:700px;margin:20px auto;}
    .page-wrap h3 {font-weight:400;font-size:24px;}
    .page-wrap p {line-height: 1.4;}
    .wp-block-columns {max-width:700px;margin:auto;}
    .wp-block-column p {width:100%;}
  </style>
</section>
In the following example, CSS brings the WordPress single.php to life. The only difference in the HTML is the removal of the outer <div></div> element around the featured image. Websites perform better when rendered with CSS. This is because browsers run CSS, not websites. As such, they load faster.
The image below shows how this WordPress single.php Spatial Presentation Page will look:
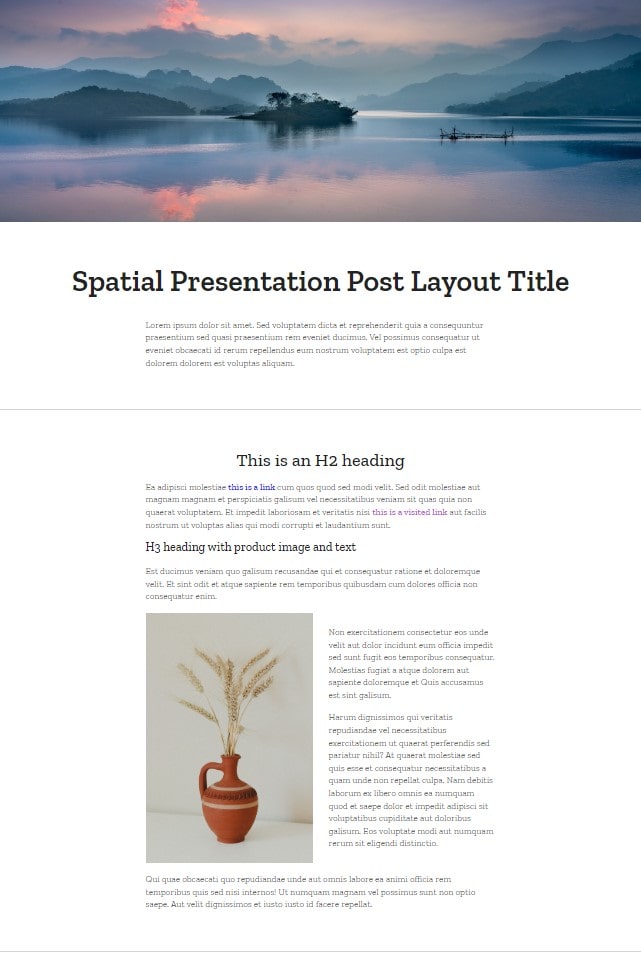
To view this example post live, just click on Spatial Presentation Post.
Spatial-Presentation Post CSS explained
In the CSS, the image class added to the image by WordPress wp-post-image is set to 100% width and auto height. Then, object-fit is set to contain. This spans it across the entire width and keeps it in place regardless of the viewport width. Also, it maintains the aspect ratio.
Next, the vertical spacing is set using margin and padding depending on the context. Both the H1 title and H2 headings are centered horizontally. But then, the H3 headings are left-justified to line up with the text since they are part of the paragraph context.
To place the image on the left and text on the right within the content, a 50-50 two-column Columns Block was used. In the paragraph column, the vertical alignment was set to centered for even space above and below.
In the CSS of this theme div, the class for columns and column are set to align everything properly. The single column width is set to 700px just like the paragraph width within the CSS.
Finally, the H2 headings have upper padding and a top border to create a full-width dividing line between H2 heading sections. Note that the page-wrap class is set to 80px of top padding. That is to bring it below the top bar and menu. Change that number as needed.
Latest Posts theme div below the post
To keep people on your website, reveal your latest posts to them at the bottom of your blog post. This theme div pulls three blog posts from your WordPress database. Then, it presents them in chronological order. Also, it skips over the current post they have read if it was part of the latest three posts, moving to the fourth in that case.
See how this Latest Posts theme div will look in the image below:
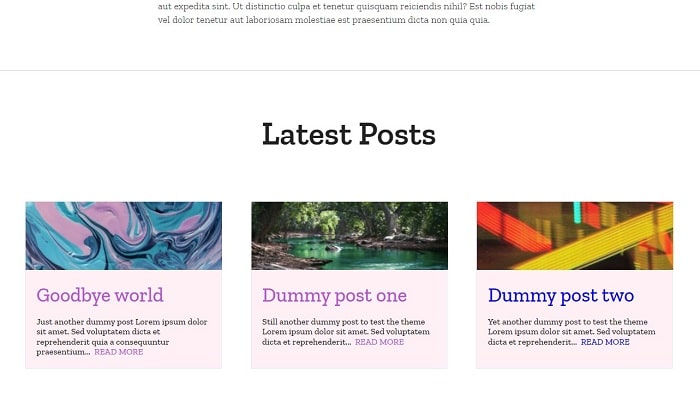
Notice how this Latest Posts theme div aligns with the Spacial-Presentation Post theme, making it seamless. Now, paste the following theme div below your blog post theme dive in WordPress single.php:
<section class="spatial-posts-wrap">
<h2 class="posts-heading">Latest Posts</h2>
<?php
$args=array(
'posts_per_page' => 3,
'post_type' => 'post',
'post__not_in' => array(get_the_ID()) // Exclude current post fronm the three posts
);
$wordcount=18; // # of words in each excerpt
$query = new WP_Query($args); // Define the $query
if ($query->have_posts()) { // Check if posts exist
while ($query->have_posts()) { // While posts exist
$query->the_post(); // Query the post within $query
?>
<article>
<a href="<?php the_permalink() ?>"><?php the_post_thumbnail('medium-image'); ?></a>
<h2 class="blog-title"><a href="<?php the_permalink() ?>"><?php the_title(); ?></a></h2>
<p><?php echo wp_trim_words(get_the_content(),$wordcount,'...'); ?><a href="<?php the_permalink() ?>"> READ MORE</a></p>
</article>
<?php
}
} ?>
<style>
/* Typeface */
.spatial-posts-wrap h2,.spatial-posts-wrap p {font-family:'Zilla Slab',serif;}
.spatial-posts-wrap h2 {}
.spatial-posts-wrap h2 a:link {color:blue;font-weight:500;text-decoration:none;} /* Unvisited link */
.spatial-posts-wrap h2 a:visited {color:mediumorchid;} /* visited link */
.spatial-posts-wrap h2 a:hover {color:lightseagreen;transform:scaleY(1.2);transition:.1s ease;} /* raise vertically */
.spatial-posts-wrap h2 a:active {color:limegreen;} /* Green for GO */
.spatial-posts-wrap p {}
.spatial-posts-wrap p a:link {color:blue;font-weight:500;text-decoration:none;} /* Unvisited link */
.spatial-posts-wrap p a:visited {color:mediumorchid;} /* visited link */
.spatial-posts-wrap p a:hover {color:lightseagreen;transform:scaleY(1.2);transition:.1s ease;} /* raise vertically */
.spatial-posts-wrap p a:active {color:limegreen;} /* Green for GO */
/* Structure */
.spatial-posts-wrap {display:flex;flex-wrap:wrap;justify-content:space-evenly;padding:80px 10px;background:white;border-top:solid 1px lightgray;}
.spatial-posts-wrap h2.posts-heading {margin:0 0 80px;text-align:center;font-weight:600;font-size:60px;width:100%;}
.spatial-posts-wrap article {width:360px;background:whitesmoke;border:solid 1px lavender;margin:10px;}
.spatial-posts-wrap img {width:360px;object-fit:cover;}
.spatial-posts-wrap article h2,.spatial-posts-wrap article p {margin:20px;}
@media only screen and (max-width:360px) {
.spatial-posts-wrap article {width:320px;}
.spatial-posts-wrap img {width:320px;}
}
</style>
</section>
After you save your WordPress single.php file, refresh your browser and scroll down. The theme should look seamless with these two theme divs. Make sure you have at least three posts to display.
Latest Posts theme div contents explained
Let’s walk through the code in this Latest Posts theme div. To begin, after the heading at the top, the $args array is set with three key => value pairs:
'posts_per_page' => 3sets the number of post to show per page'post_type' => 'post'Retrieves posts by post types – ‘post‘ in this case'post__not_in' =>array(get_the_ID())Retrieves the current post ID and specifies NOT to retrieve it
Next, the variable $wordcount signifies the of words in each excerpt: 18. After that, the blog loop is accessed in the same way as the WordPress single.php theme div that renders the post. But in this case, it renders the three latest posts automatically since $args parameters are set during the WP_Query($args).
As each of the three latest posts are rendered, wp_trim_words() uses the $wordcount variable to trim the entire content of the post down to 18 words for the excerpt. Finally, the featured image thumbnail, title, and READ MORE are linked to the post using the_permalink().
That’s it. Now you have an amazing WordPress single.php file that renders the Spatial Presentation theme with your latest posts at the bottom.