How to build a great header.php WordPress file
As WordPress theme developers, we have access to an amazing library of WordPress functions. This library is extensive and well-documented. On top of that, WordPress boasts the best CMS (Content Marketing System) in the world. In this guide, let’s build your header.php WordPress file piece-by-piece using theme divs.
You probably already know that your header.php WordPress file is essential for any WordPress theme. It’s where your <head></head> element declares your site <title> and important metadata used by your website. Also, it contains your menu, social icons, and other items placed at the top of almost all pages and posts.
Now, read on to uncover what goes into your header.php WordPress file and how to make it great.
Why build a header.php WordPress file and a WordPress theme?
What an easy question to answer! In fact, there are many great answers to choose regarding both the back end (server side) and the front end (User Interface or UI) of your website.
Let’s be clear…amazing websites are built every day without WordPress. But with WordPress, the best CMS is already built right in – the blog loop. Use their blog loop in many different way, customize it, add additional loops as I did with these theme div guides, and so on. As mentioned, use their extensive functions library to perform all of it.
Build your header.php WordPress file using theme divs
Theme divs are like a plugins without the overhead and slow performance. They are self contained, interchangeable blocks of code. Also, each theme div contains CSS to customize for your design.
To use them, simply paste theme divs into specified locations throughout your theme files, learning as you go. Slowly but surely, learn how to make a WordPress theme yourself without the stress.
Basic theme for your header.php WordPress file
If you need a basic theme for your header.php WordPress file, just download Complete theme zip file. If you want to learn how to build a WordPress theme from scratch, check out HOW TO MAKE A WORDPRESS THEME. Then, to build an amazing front-page.php file, click on MAKE AN AMAZING WORDPRESS FRONT-PAGE.PHP FILE. Finally, to build an awesome page.php file, check out How to build a great WordPress page.php file.
Install your WordPress theme to its final destination
In the WordPress Dashboard of yourwebsite.com, go to Plugins and click on the “Add New” button in the top-left corner. Then, click on the “Upload Plugin” button in the top-left corner. Next, click on “Choose File” and select your downloaded file in your downloads folder. Finally, click “Install Now.”
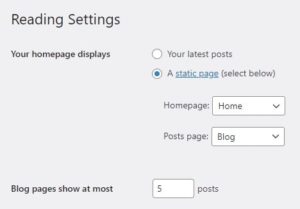
After installing the theme, go into Customize > Themes, pick your new theme and activate it. Next, create your Home and Blog pages and set static page, Home and Blog.
The final step to setting up your standard web pages is to set your Blog and Home pages in the WordPress Dashboard: Settings > Reading.
ing, select “A static page (select below)” at the top. Then, select “Home” from the “Homepage:” selector and “Blog” from the “Posts page:” selector. Next, set “Blog pages show at most” to an odd number – I use five. Finally, scroll down and click Save. You’re all set!
header.php WordPress file starting content
The content of your header.php file contains the opening <html> tag, the entire <head></head> element, the opening <body> tag. Then in this example, it contains three theme divs. To explain, your <head></head> element declares the metadata – the important things about your website. Also, this is where you’ll paste codes from Google and other sources in the future.
At the top of your WordPress header.php file, paste in the following code:
<!DOCTYPE HTML> <!-- HEADER -->

<?php $info = $args; /* Array passed by page file put into $info array for common naming */ ?>

<html lang="en-US"> <!-- <html> is opened here and closed in footer.php - contains entire website -->
The <html> opening tag is without a closing tag in header.php. The </html> closing tag is located at the bottom of the footer since it contains the following <head> metadate element and your entire website within it.
Insert the HEAD metadata element
Next, the <head> section declares your website metadata: website title, character set and viewport sizing, tagline, keywords, and URL share content for social-media sharing. In the future, you’ll paste various codes into your <head> section from Google and other services that you use with your website.
Social-media sharing declarations provide visual impact when sharing your link. To explain, when you enter your website URL into a social media platform like Facebook or Linkedin, a thumbnail, title, tagline, and the URL itself will automatically load and display. Sometimes it takes a few seconds to load.
Your URL sharing thumbnail is named share-thumbnail-900×600.jpg. Created and save this image in your theme’s /images folder. As an example, a website screenshot of 900px x 600px works great.
Paste the following <head></head> element that contains everything described above:
<head>
	<title><?php echo $info['name']; ?></title> <!-- Pulls title you set in WorPress -->
	<meta charset="UTF-8" name="viewport" content="width=device-width, initial-scale=1"> <!-- 'width-device-width' keeps viewport within device horizontal boundaries -->
	<meta name="description" content="<?php echo $info['desc']; ?>" /> <!-- Pulls description (tagline) you set in WorPress -->
	<meta name="keywords" content="<?php echo $info['name']; ?>" /> <!-- Sets title as primary keyword -->
	<meta property="og:title" content="<?php echo $info['name']; ?>" /> <!-- Causes title to show up when sharing URL online -->
	<meta property="og:image" content="<?php echo $info['uri'].'/images/share-thumbnail-900x600.jpg'; ?>" /> <!-- Causes thumbnail to show up when sharing URL online -->
	<meta property="og:description" content="<?php echo $info['desc']; ?>" /> <!-- Causes description (tagline) to show up when sharing URL online -->
	<meta property="og:url" content="https://yourwebsite.com" /> <!-- Causes URL to show up when sharing URL online -->
	<meta property="og:image:width" content="900" /> <!-- Sets share thumbnail width -->
	<meta property="og:image:height" content="600" /> <!-- Sets share thumbnail height -->
	<meta property="og:type" content="website" /> <!-- Sets share content to "website" -->
	<?php wp_head(); ?> <!-- Sends the scripts and data within this head element to the front end -->
</head>
The <head> element is a container for the following elements: <title>, <style>, <meta>, <link>, <script>, and <base>. HTML metadata is data about the HTML document. It is not displayed.
BODY tag starts your BODY element
Your <body> element contains or wraps all of your website content. From the header content and main page content to the footer content, every section goes into the <body> element. Then, your <body> element is closed with the </body> closing tag at the end of your footer.php file below all website content.
Paste the following <body> tag below your <head></head> metadata element:
<body> <!-- <body> is opened here and closed in footer.php - contains all website content -->
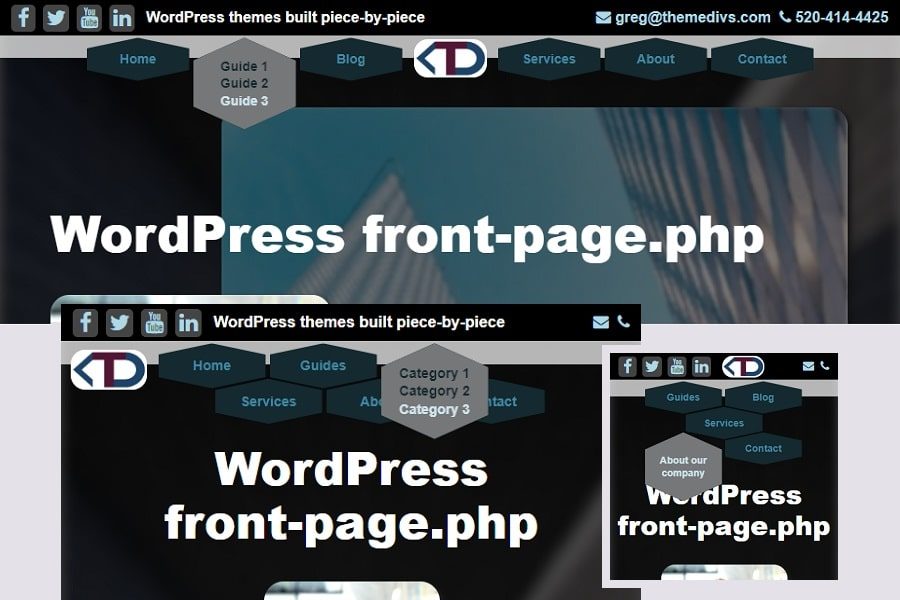
Next, the <header> element is a theme div that will contain your TOP BAR and MENU WITH LOGO theme divs nested inside it once you paste them in place. Note that the <header> element ends with its own CSS within the <style> element before the closing tag. That is what makes your header a self-contained theme div.
HEADER theme div contains nested theme divs
Paste in the following <header> theme div below your <body> tag:
<header> <!-- Contains nested TOP BAR and MENU WITH LOGO theme divs -->
	<article> <!-- Wraps entire header for CSS positioning purposes -->

	<!–- Nested header theme divs go here -–>

	</article>
	<style>
		header {
			position:sticky;
			top:0;
			width:100%;
			z-index:9;
		}
		header article {
			position:absolute;
			width:100%;
			top:0;
		}
		header article li {
			list-style-type:none!important;
			text-decoration:none!important;
		}
	</style>
</header>

<!-- REMINDER: </html> and </body> closing tags are located in the footer at the end - CSS for both is located there -->
Now, let’s add the TOP BAR theme div that sits at the top of the header. Paste the following theme div above or in place of the comment <!–- Nested header theme divs go here -–>:
<section class="top-bar"> <!-- Self-contained TOP BAR theme div - like a plugin -->
<nav class="social-icons-wrap">
<ul class="social-icons"> <!-- URLs are pulled from WordPress Dashboard Settings > General as defined in admin.php -->
<li><a href="<?php echo 'https://'.$info['fb-url']; ?>"><i class="fa fa-facebook"></i></a></li>
<li><a href="<?php echo 'https://'.$info['tw-url']; ?>"><i class="fa fa-twitter"></i></a></li>
<li><a href="<?php echo 'https://'.$info['yt-url']; ?>"><i class="fa fa-youtube"></i></a></li>
<li><a href="<?php echo 'https://'.$info['li-url']; ?>"><i class="fa fa-linkedin"></i></a></li>
</ul>
</nav>
<p id="tagline"><?php echo $info['desc']; ?></p>
<span class="top-cont-info"> <!-- Email and phone# pulled from WordPress Dashboard Settings > General as defined in admin.php -->
<a href="mailto:<?php echo $info['email']; ?>">
<i class="fa fa-envelope"></i>
<span class="top-cont-email"> <?php echo $info['email']; ?></span>
</a>
<a href="tel:<?php echo $info['phn']; ?>">
<i class="fa fa-phone"></i>
<span class="top-cont-phone font-top-cont-info"><?php echo $info['phn']; ?></span>
</a>
</span>
<style>
.top-bar {
position:relative;
display:inline-block;
background:black;
width:100%;height:38px;
margin-bottom:-4px;
transition:.2s ease;
}
.top-bar a {color:lightblue;}
.top-bar a:hover {color:lightgray;}
.top-bar .social-icons-wrap {
display:inline-block;
width:auto;
float:left;
}
.top-bar .social-icons {
display:flex;
justify-content:space-evenly;
width:100%;
padding:1px 8px;margin:0;
}
.top-bar .social-icons a {
display:block;
background:#444;
padding:2px 4px;margin:4px;
font-size:22px;
text-align:center;
min-width:26px;
border-radius:5px;
}
.top-bar .social-icons a:hover {background:gray;}
#tagline {;
position:relative;
display:inline-block;
margin:10px 0 0;
font-weight:600;
float:left;
color:white;
}
.top-cont-info {margin:10px 8px 0;;float:right;}
@media (max-width: 899px) {.top-cont-info span {display:none;}} /* Removes phone# and email for mobile - leaves icons in place */
@media (max-width: 599px) {#tagline {display:none;}} /* Removes tagline in mobile */
</style>
</section>
Lastly, let’s add the MENU WITH LOGO theme div by pasting in the following theme div below the TOP BAR theme div:
<section class="header-main">
  <a href="<?php echo $args['url']; ?>" class="logo-wrap logo-left">
    <img src="<?php echo $args['uri'] . '/images/logo.png'; ?>" alt="<?php echo $args['name']; ?>">
  </a>
  <nav class="header-menu"> <!-- Background defined in JAVA Script -->
    <ul class="hdr-menu-ul">
      <li class="hdr-menu-li hdr-li-1 hdr-li-grp1">
        <div class="hdr-menu-front hdr-menu-face">
          <p>Home</p>
        </div>
        <div class="hdr-menu-back hdr-menu-face">
          <p><a href="<?php echo $args['url']; ?>">Return to our home page</a></p>
        </div>
      </li>
      <li class="hdr-menu-li hdr-li-2 hdr-li-grp1">
        <div class="hdr-menu-front hdr-menu-face">
          <p>Guides</p>
        </div>
        <div class="hdr-menu-back hdr-menu-face">
          <p>
            <a href="<?php echo $args['url'].'/guides/'; ?>">Guide 1</a>
            <a href="<?php echo $args['url'].'/guides/'; ?>">Guide 2</a>
            <a href="<?php echo $args['url'].'/guides/'; ?>">Guide 3</a>
          </p>
        </div>
      </li>
      <li class="hdr-menu-li hdr-li-3 hdr-li-grp1">
        <div class="hdr-menu-front hdr-menu-face">
          <p>Blog</p>
        </div>
        <div class="hdr-menu-back hdr-menu-face">
          <p>
            <a href="<?php echo $args['url'].'/blog/'; ?>">Category 1</a>
            <a href="<?php echo $args['url'].'/blog/'; ?>">Category 2</a>
            <a href="<?php echo $args['url'].'/blog/'; ?>">Category 3</a>
          </p>
        </div>
      </li>
      <li>
        <a href="<?php echo $args['url']; ?>" class="logo-wrap logo-center">
          <img src="<?php echo $args['uri'] . '/images/logo.png'; ?>" alt="<?php echo $args['name']; ?>">
        </a>
      </li>
      <li class="hdr-menu-li hdr-li-4 hdr-li-grp2">
        <div class="hdr-menu-front hdr-menu-face">
          <p>Services</p>
        </div>
        <div class="hdr-menu-back hdr-menu-face">
          <p>
            <a href="https://remeximage.com/idx-website/">Web Development</a>
            <a href="https://remeximage.com/content-marketing-for-real-estate-uncover-how-to-do-it-right/">Content Marketing</a>
          </p>
        </div>
      </li>
      <li class="hdr-menu-li hdr-li-5 hdr-li-grp2">
        <div class="hdr-menu-front hdr-menu-face">
          <p>About</p>
        </div>
        <div class="hdr-menu-back hdr-menu-face">
          <p>
            <a href="https://themedivs.com/about/">About our company</a>
          </p>
        </div>
      </li>
      <li class="hdr-menu-li hdr-li-6 hdr-li-grp2">
        <div class="hdr-menu-front hdr-menu-face">
          <p>Contact</p>
        </div>
        <div class="hdr-menu-back hdr-menu-face">
          <p>
            <a href="https://themedivs.com/#contact">Contact us today</a>
          </p>
        </div>
      </li>
    </ul>
  </nav>
  <style>
    .header-main {
      display:block;
      position:relative;
      height:24px;
      background:rgba(255,255,255,.7);
      padding-top:5px;
      --h: 40px!important; /* From @media 640 */
      --w: 110px!important; /* From @media 640 */
      --m: 2px!important; /* From @media 640 */
      --f: calc(1.732*var(--w) + 4*var(--m) - 1px);
      --bg1: #142930; /* Menu item front */
      --bg2: #767778; /* Menu item back */
    }
    /*** HEADER LOGO ***/
    .logo-wrap {height:0;padding:4px 10px;}
    .logo-wrap img {
      background:white;
      border-radius:15px;
      max-width:78px;
      transition:.2s ease;
    }
    .logo-left {display:none;}

    /*** HEADER MENU ***/
    .header-menu {
      margin:-15px auto 0;
      position:relative;
      display:flex;
      justify-content:center;
    }
    .hdr-menu-ul {
      position:relative;
      display:flex;
      flex-wrap:wrap;
      font-size: 0;
      padding:10px;
    }
    .hdr-menu-li {
      position:relative;
      display:inline-block;
      font-size:14px;
      font-weight:600;
      margin: var(--m);
      height: calc(var(--h)*1.1547);
      width: var(--w);
      clip-path: polygon(0% 25%, 0% 75%, 50% 100%, 100% 75%, 100% 25%, 50% 0%);
      margin-bottom: calc(var(--m) - var(--w)*0.2885);
      transition:.4s ease;
    }
    .hdr-menu-li:hover {
      --b: #FFAB1A;--h: 85px;
      z-index:9;transition:.4s ease;
    }
    .hdr-menu-li:hover > .hdr-menu-back {
      z-index:3;
      margin-top:0; /* Bring down from -400px */
      transition:.6s ease;
    }
    .hdr-menu-face { /* Both front & back faces */
      display:flex;
      justify-content:center;
      align-items:center;
      height:calc(var(--h)*1.1547);
      width: var(--w);
      position:absolute;
      text-align:center;
      transition:.4s ease;
    }
    .hdr-menu-front {
      background:var(--bg1);
      color:#4287a0; /* Front font color */
      /* Colors icon too but recolored below */
      z-index:2;
      transition:.4s ease;
    }
    .hdr-menu-back {
      z-index:3;
      margin-top:-200px;
      background:var(--bg2);
      transition:.8s ease;
    }
    .hdr-menu-back a {
      position:relative;
      display:block;
      line-height:1.3;
      font-weight:700;
      color:#142930; /* Back font color */
      min-width:100px;
      transition:.2s;
    }
    .hdr-menu-back a:hover {color:#cee3eb;transition:.2s;}
    @media (max-width: 820px) {
      .hdr-menu-ul {width:420px;}
      .hdr-li-grp2 {margin-top:20px;}

      .hdr-li-4 {margin-left:60px;}
      .hdr-li-grp1:hover {margin-bottom:-90px;}
      .logo-left {display:block;position:absolute;}
      .logo-center {display:none;}
    }
    @media (max-width: 640px) {
      .header-menu .hdr-menu-li {
        font-size:14px;transition:.4s ease;
      }
      .header-menu .hdr-menu-li:hover {--h:85px;}
      .header-menu .hdr-menu-face {
        height:calc(var(--h)*1.1547);
        width:var(--w);transition:.4s ease;
      }
      .header-menu .hdr-menu-front {height:calc(var(--h)*1.1547);}
      .header-menu .hdr-menu-i {opacity:0!important;}
    }
    @media (max-width: 600px) {
      .logo-wrap {top:-38px;left:150px;}
      .logo-wrap img {width:60px;}
    }
    @media (max-width: 479px) {
      .hdr-li-1 {display:none;}
      .hdr-menu-ul {width:250px;}
      .hdr-li-grp2:hover {margin-bottom:-82px;}
    }
  </style>
</section>
Now that you’ve completed your header.php WordPress file, be sure to fully test everything in your header. From your header down to your footer, everything should render correctly and function properly. Don’t forget to test every link by clicking on each one.
Once it all works, congratulations! You now know how to use theme divs to build a web page. Uncover more theme divs by clicking on Guides in the menu.